HP EX490 HP MediaSmart Server - User Guide - Page 39
Before Connecting to the Server, Types of Accounts
 |
UPC - 884962255391
View all HP EX490 manuals
Add to My Manuals
Save this manual to your list of manuals |
Page 39 highlights
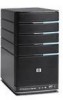
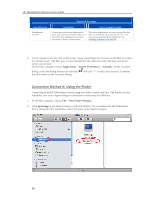
Set up and Installation PCs on your network. This document explains how to connect your Mac to the server so you can access shared folder contents. In this article... Before Connecting to the Server Connection Method A: Using the Finder Connection Method B: Using Connect to Server and the Server Name Connection Method C: Using Connect to Server and the Server's IP Address Pinging the Server Before Connecting to the Server Some set up and decisions are required before connecting your Mac computer to the server and accessing shared folders. • The client software is installed on one PC. • The client software is installed on the Mac you are trying to connect to the server. • Decide how you will connect the Mac to the server-administrator account, user account, or guest account. Type of Account Guest Account User Account Types of Accounts Description Server Account Creation The guest account is useful when people are visiting your and need temporary access to your server. In these cases, it probably does not make sense to create a user account for each person. Instead, you can create a single guest account that all visitors use. The guest account may or may not have a password. 1. From the Server menu , select Launch Home Server Console. 2. Select the User Accounts tab. 3. Double-click the Guest account and click Enable Account... on the Properties dialog. You have the option to create a password for the guest account or leave it blank. 4. Click the Shared Folder tab to define folder access. The server pairs user accounts on the server with those on a computer to identify who is connecting to the server and to maintain security. Each server user account has a unique user name and password that should match their computer log on name and password. Each user account on the server can have their own shared folder access levels. 1. From the Server menu , select Launch Home Server Console. 2. Select the User Accounts tab. 3. Click Add from the Windows Home Server Console User Accounts tab. Complete the information in the Add User Account wizard. 33
-
 1
1 -
2
-
3
-
4
-
5
-
6
-
7
-
8
-
9
-
10
-
11
-
12
-
13
-
14
-
15
-
16
-
17
-
18
-
19
-
20
-
21
-
22
-
23
-
24
-
25
-
26
-
27
-
28
-
29
-
30
-
31
-
32
-
33
-
 34
34 -
 35
35 -
 36
36 -
 37
37 -
 38
38 -
 39
39 -
 40
40 -
 41
41 -
 42
42 -
 43
43 -
 44
44 -
45
-
46
-
47
-
48
-
49
-
50
-
51
-
52
-
53
-
54
-
55
-
56
-
57
-
58
-
59
-
60
-
61
-
62
-
63
-
64
-
65
-
66
-
67
-
68
-
69
-
70
-
71
-
72
-
73
-
74
-
75
-
76
-
77
-
78
-
79
-
80
-
81
-
82
-
83
-
84
-
85
-
86
-
87
-
88
-
89
-
90
-
91
-
92
-
93
-
94
-
95
-
96
-
97
-
98
-
99
-
100
-
101
-
102
-
103
-
104
-
105
-
106
-
107
-
108
-
109
-
110
-
111
-
112
-
113
-
114
-
115
-
116
-
117
-
118
-
119
-
120
-
121
-
122
-
123
-
124
-
125
-
126
-
127
-
128
-
129
-
130
-
131
-
132
-
133
-
134
-
135
-
136
-
137
-
138
-
139
-
140
-
141
-
142
-
143
-
144
-
145
-
146
-
147
-
148
-
149
-
150
-
151
-
152
-
153
-
154
-
155
-
156
-
157
-
158
-
159
-
160
-
161
-
162
-
163
-
164
-
165
-
166
-
167
-
168
-
169
-
170
-
171
-
172
-
173
-
174
-
175
-
176
-
177
-
178
-
179
-
180
-
181
-
182
-
183
-
184
-
185
-
186
-
187
-
188
-
189
-
190
-
191
-
192
-
193
-
194
-
195
-
196
-
197
-
198
-
199
-
200
-
201
-
202
-
203
-
204
-
205
-
206
-
207
-
208
-
209
-
210
-
211
-
212
-
213
-
214
-
215
-
216
-
217
-
218
-
219
-
220
-
221
-
222
-
223
-
224
-
225
-
226
-
227
-
228
-
229
-
230
-
231
-
232
-
233
-
234
-
235
-
236
-
237
-
238
-
239
-
240
-
241
-
242
-
243
-
244
-
245
-
246
-
247
-
248
-
249
-
250
-
251
-
252
-
253
-
254
-
255
-
256
-
257
-
258
-
259
-
260
-
261
-
262
-
263
-
264
-
265
-
266
-
267
-
268
-
269
-
270
-
271
-
272
-
273
-
274
-
275
-
276
-
277
-
278
-
279
-
280
-
281
-
282
-
283
-
284
-
285
-
286
-
287
-
288
-
289
-
290
-
291
-
292
-
293
-
294
-
295
-
296
-
297
-
298
-
299
-
300
-
301
-
302
-
303
-
304
-
305
-
306
-
307
-
308
-
309
-
310
-
311
-
312
-
313
-
314
-
315
-
316
-
317
-
318
-
319
-
320
-
321
-
322
-
323
-
324
-
325
-
326
-
327
-
328
-
329
-
330
-
331
 |
 |