HP G72-b49WM HP G72 Notebook PC - Maintenance and Service Guide - Page 54
and lift the hard drive out
 |
View all HP G72-b49WM manuals
Add to My Manuals
Save this manual to your list of manuals |
Page 54 highlights
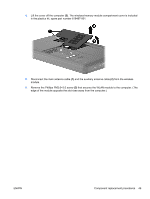
3. Lift the left side of the hard drive cover (2), swing it forward, and remove the cover (3). The hard drive cover is included in the plastics kit, spare part number 616497-001. 4. Remove the four Phillils PM2.5x5.0 screws (1) that secure the hard drive to the computer. Use the mylar tabs (2) to lift up the hard drive. Disconnect the hard drive cable from the system board (3) and lift the hard drive out (4) of the hard drive bay. 5. To replace the hard drive bracket, remove the four Phillips PM3.0×4.0 screws (1) that secure the hard drive bracket to the hard drive 44 Chapter 4 Removal and replacement procedures ENWW
-
 1
1 -
2
-
3
-
4
-
5
-
6
-
7
-
8
-
9
-
10
-
11
-
12
-
13
-
14
-
15
-
16
-
17
-
18
-
19
-
20
-
21
-
22
-
23
-
24
-
25
-
26
-
27
-
28
-
29
-
30
-
31
-
32
-
33
-
34
-
35
-
36
-
37
-
38
-
39
-
40
-
41
-
42
-
43
-
44
-
45
-
46
-
47
-
48
-
 49
49 -
 50
50 -
 51
51 -
 52
52 -
 53
53 -
 54
54 -
 55
55 -
 56
56 -
 57
57 -
 58
58 -
 59
59 -
60
-
61
-
62
-
63
-
64
-
65
-
66
-
67
-
68
-
69
-
70
-
71
-
72
-
73
-
74
-
75
-
76
-
77
-
78
-
79
-
80
-
81
-
82
-
83
-
84
-
85
-
86
-
87
-
88
-
89
-
90
-
91
-
92
-
93
-
94
-
95
-
96
-
97
-
98
-
99
-
100
-
101
-
102
-
103
-
104
-
105
-
106
-
107
-
108
-
109
-
110
-
111
-
112
-
113
-
114
-
115
-
116
-
117
-
118
-
119
-
120
-
121
-
122
-
123
-
124
-
125
-
126
-
127
-
128
-
129
-
130
-
131
-
132
-
133
-
134
-
135
-
136
-
137
-
138
-
139
-
140
 |
 |
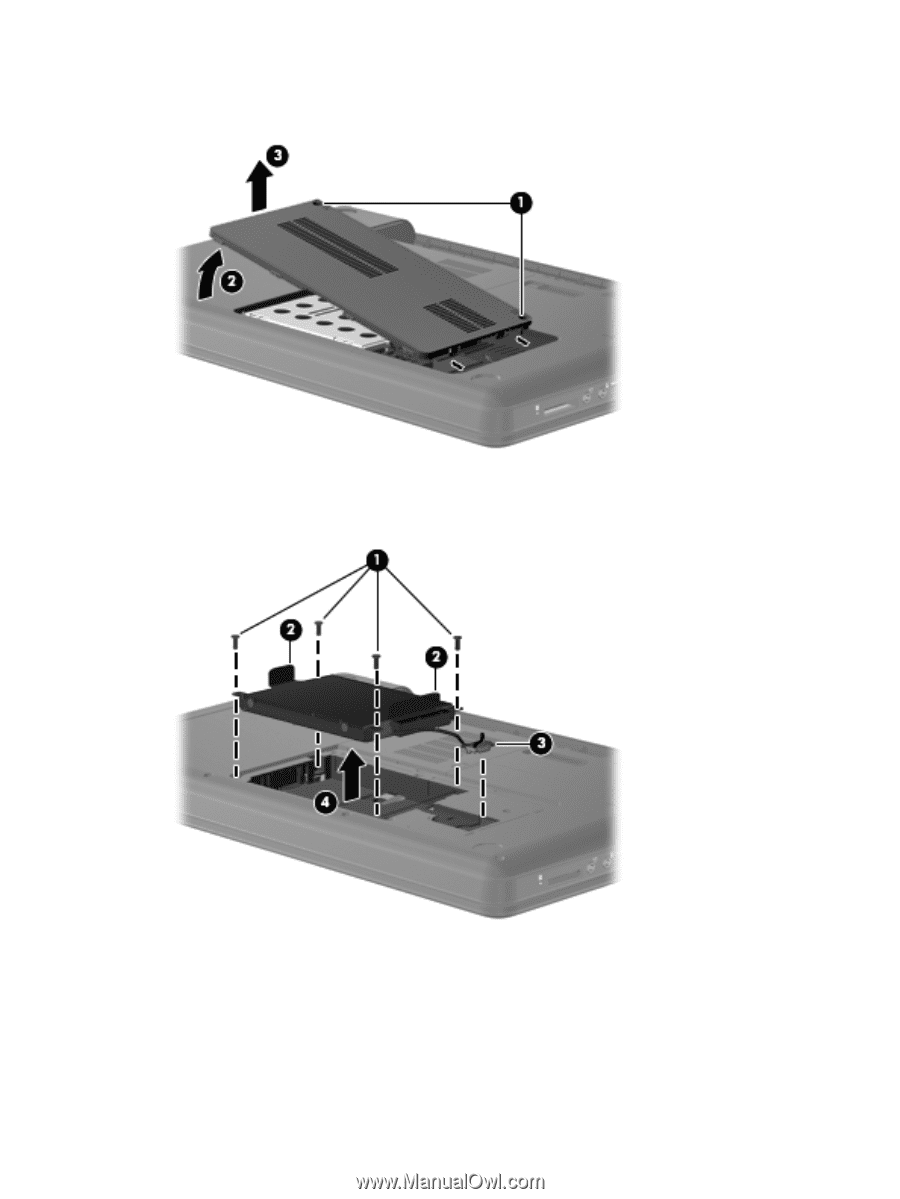
3.
Lift the left side of the hard drive cover
(2)
, swing it forward, and remove the cover
(3)
. The hard
drive cover is included in the plastics kit, spare part number 616497-001.
4.
Remove the four Phillils PM2.5x5.0 screws
(1)
that secure the hard drive to the computer. Use
the mylar tabs
(2)
to lift up the hard drive. Disconnect the hard drive cable from the system board
(3)
and lift the hard drive out
(4)
of the hard drive bay.
5.
To replace the hard drive bracket, remove the four Phillips PM3.0×4.0 screws
(1)
that secure the
hard drive bracket to the hard drive
44
Chapter 4
Removal and replacement procedures
ENWW