HP Indigo WS6000 Rewinder Service - Page 23
Replacing the servo motor, Start the press.
 |
View all HP Indigo WS6000 manuals
Add to My Manuals
Save this manual to your list of manuals |
Page 23 highlights
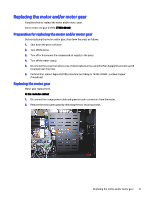
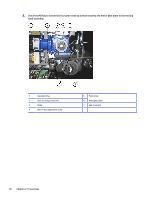
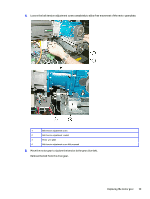
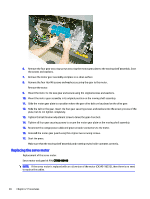
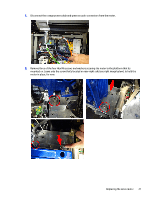
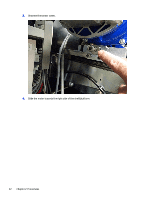
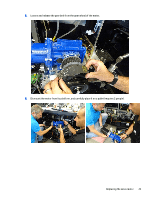
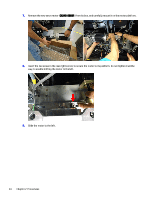
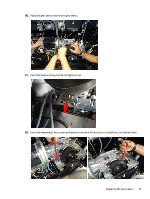
6. Remove the four gear securing screws securing the motor gear plate to the moving shelf assembly. Save the screws and washers. 7. Remove the motor gear assembly and place on a clean surface. 8. Remove the four Hex M6 screws and washers securing the gear to the motor. Remove the motor. 9. Mount the motor to the new gear and secure using the original screws and washers. 10. Mount the motor gear assembly in its original position on the moving shelf assembly. 11. Slide the motor gear plate to a position where the gear drive belt can be placed on the drive gear. 12. Slide the belt on the gear. Insert the four gear securing screws and washers into the screw grooves of the plate, but do not tighten completely. 13. Tighten the belt tension adjustment screw to tense the gear drive belt. 14. Tighten all four gear securing screws to secure the motor gear plate on the moving shelf assembly. 15. Reconnect the orange power cable and green encoder connectors to the motor. 16. Reinstall the motor gear guard using the original two securing screws. 17. Start the press. Make sure that the moving shelf assembly and rotating rewind roller operates correctly. Replacing the servo motor Replacement of the servo motor. Servo motor and gear kit P/N: CT990-00440 NOTE: If the servo motor is replaced with an old version of the motor (CA345-18332), then there is no need to replace the cables. 20 Chapter 2 Procedures
-
 1
1 -
2
-
3
-
4
-
5
-
6
-
7
-
8
-
9
-
10
-
11
-
12
-
13
-
14
-
15
-
16
-
17
-
 18
18 -
 19
19 -
 20
20 -
 21
21 -
 22
22 -
 23
23 -
 24
24 -
 25
25 -
 26
26 -
 27
27 -
 28
28 -
29
-
30
-
31
-
32
-
33
-
34
-
35
-
36
-
37
-
38
-
39
-
40
-
41
-
42
-
43
-
44
-
45
-
46
-
47
-
48
-
49
-
50
-
51
-
52
-
53
-
54
-
55
-
56
-
57
-
58
-
59
-
60
-
61
-
62
-
63
-
64
-
65
-
66
-
67
-
68
-
69
-
70
-
71
-
72
-
73
-
74
-
75
-
76
-
77
-
78
-
79
-
80
-
81
-
82
-
83
-
84
-
85
-
86
-
87
-
88
 |
 |
