HP Indigo WS6000 How-to Guide
HP Indigo WS6000 Manual
 |
View all HP Indigo WS6000 manuals
Add to My Manuals
Save this manual to your list of manuals |
HP Indigo WS6000 manual content summary:
- HP Indigo WS6000 | How-to Guide - Page 1
Working with HP Indigo ElectroInk Fade Resistant Orange for HP Indigo WS6000 Series Digital Presses and HP Indigo 8000 Digital Press How-to Guide May 2019 - HP Indigo WS6000 | How-to Guide - Page 2
respective holders. The HP Indigo press' counter feature records the number of impressions you make using your press. The counter does not reflect any previous use of the press or its age. This English version of this document must be used as the original instructions. The HP Indigo press is a Class - HP Indigo WS6000 | How-to Guide - Page 3
reading this document?...1 Introduction ...1 Prerequisites ...1 2 Procedures ...2 Working with Fade Resistant Orange ...2 Returning to regular Orange ink...8 3 Troubleshooting...10 Scratches on print...10 Image cracks ...10 4 Service and support ...12 Printing instructions ...12 Appendix A ...0 iii - HP Indigo WS6000 | How-to Guide - Page 4
new ink has been qualified for use only on HP Indigo WS6000 Series Digital Presses and the HP Indigo 8000 Digital Press. When printing jobs requiring the functionality of the HP Indigo ElectroInk Fade Resistant inks, these inks replace the regular HP Indigo ElectroInk Yellow, Magenta, and Orange on - HP Indigo WS6000 | How-to Guide - Page 5
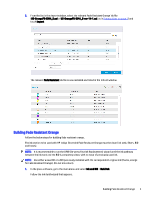
orange. Fade Resistant Orange can be installed in ink station 1, 6, or 7. Fade Resistant Orange should be located in BID station 1, 6, or 7. Figure 2-1 HP Indigo ElectroInk Fade Resistant Orange in the BID 1. In the press software, go to the Ink List window and touch Import. 2 Chapter 2 Procedures - HP Indigo WS6000 | How-to Guide - Page 6
with HP Indigo ElectroInk Fade Resistant Orange must be clean (ink tank, filters, BID and hoses). NOTE: It is recommended to run the OFIR (On-press Fast Ink Replacement) wizard until the ink pathway between the ink tank and the BID is completely clean, with no trace of previously used ink. NOTE: Use - HP Indigo WS6000 | How-to Guide - Page 7
to create an ink solution at an exact density solution. The cartridge is either supplied in the special color box or can be created by using an on-site ink mixing system (if available). 3. Under Build Ink > Load parameters select the relevant Fade Resistant Orange ink file (US‑OrangeFR‑EIM4_5.usi - HP Indigo WS6000 | How-to Guide - Page 8
that all the ink was compressed into the ink tank. If you find that the ink cartridge still contains ink (empty cartridge weighs ~260 gr), manually empty the cartridge using the element activation. Only then, use the ink density calibration wizard and set the value to 1.7. Defining a substrate for - HP Indigo WS6000 | How-to Guide - Page 9
4. Under the selected substrate's properties in the Color Control tab: a. Check that Gloss level definition has not changed. b. For presses with SPM (spectrophotometer), make sure that the Create media fingerprint check box is selected. Creating a new substrate Follow the below steps to create a new - HP Indigo WS6000 | How-to Guide - Page 10
the New substrate window, define your substrate. NOTE: For presses with SPM (spectrophotometer), make sure that the Create media fingerprint Method, touch Optical density. 6. In the Optical Density window, manually change the OD target according to the following guidelines. Fade Resistant Orange - HP Indigo WS6000 | How-to Guide - Page 11
orange ink. 1. Perform Dry BID from Main menu > Ink and BID > BID > Dry BID. 2. Clean station 1, 6, or 7 using OFIR (On-press Fast Ink Replacement). 3. Wash the ink tanks using imaging oil. 4. Clean the BID using imaging oil. 5. Go to Main menu > Ink and BID > Build Ink, and build the orange ink - HP Indigo WS6000 | How-to Guide - Page 12
f. In the Optical Density window, restore the default values by touching Restore Default and OK. g. Follow the wizard to complete the color calibration. Returning to regular Orange ink 9 - HP Indigo WS6000 | How-to Guide - Page 13
3 Troubleshooting Scratches on print If scratches are seen on the print, clean the balancing roller, charge roller, and wiper. Image cracks In and go to Properties > Separations. b. In the Separation tab, select High coverage from the White drying policy dropdown list. 10 Chapter 3 Troubleshooting - HP Indigo WS6000 | How-to Guide - Page 14
Image cracks 11 - HP Indigo WS6000 | How-to Guide - Page 15
76101 Israel APJ HP Asia Pacific Pte Ltd No.3 Tuas Link 4 #02-01 Singapore 637016 Printing instructions Follow these recommendations to achieve the best print quality. NOTE: To ensure a high quality print, use the CA394-29600_PRINT.pdf version of this document. 12 Chapter 4 Service and support - HP Indigo WS6000 | How-to Guide - Page 16
.94 cm) HP Indigo digital press Front cover - duplex Rear cover - simplex Full color - high resolution Lamination - shiny front and rear covers 80 g 8.27 x 11.00 in (21 x 27.94 cm) HP Indigo digital press Duplex Full color - high resolution None 2 saddle stitch on left side Printing instructions 13 - HP Indigo WS6000 | How-to Guide - Page 17
This is an HP Indigo digital print. www.hp.com/go/indigo PN: CA394-29600
-
 1
1 -
 2
2 -
 3
3 -
 4
4 -
 5
5 -
 6
6 -
 7
7 -
8
-
9
-
10
-
11
-
12
-
13
-
14
-
15
-
16
-
17
 |
 |
