HP Integrity rx2600 Windows #002: Smart Setup Guide - Page 20
Setting up a console, Set up a remote console
 |
View all HP Integrity rx2600 manuals
Add to My Manuals
Save this manual to your list of manuals |
Page 20 highlights
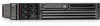
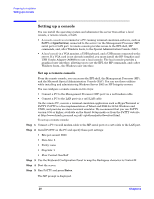
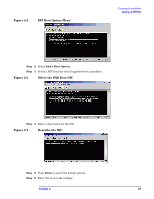
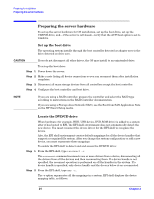
Preparing for installation Setting up a console Setting up a console You can install the operating system and administer the server from either a local console, a remote console, or both: • A remote console is a terminal or a PC running terminal emulation software, such as PuTTY or HyperTerminal, connected to the server via the Management Processor (MP) serial port or LAN port. A remote console provides access to the EFI shell, MP commands, and, after Windows boots, to the Special Administration Console (SAC). • A local console is a VGA monitor, a USB keyboard, and a USB mouse connected to the server. If a VGA card is not already installed, you must install the HP Graphics and USB Combo Adapter (A6869A) to use a local console. The local console provides a graphical user interface, allowing you to use the EFI, the MP commands, and-after Windows boots-the Windows user interface. Set up a remote console From the remote console, you can access the EFI shell, the Management Processor (MP), and the Microsoft Special Administration Console (SAC). You can use these utilities while installing and administering Windows Server 2003 on HP Integrity servers. You can configure a remote console in two ways: • Connect a PC to the Management Processor (MP) port via a null modem cable. • Connect a PC to the LAN port via a cat5 LAN cable. On the remote PC, execute a terminal emulation application such as HyperTerminal or PuTTY. PuTTY is a free implementation of Telnet and SSH for 32-bit Windows and UNIX, and provides an xterm terminal emulator. We recommend that you run PuTTY version 0.55 or higher, available on the Smart Setup media or from the PuTTY web site at http://www.chiark.greenend.org.uk/~sgtatham/putty/download.html. To set up a remote console: Step 1. Connect a PC via null modem cable to the MP serial port or a cat5 cable to the LAN port. Step 2. Install PuTTY on the PC and specify these port settings: • Bits per second: 9600 • Data bits: 8 • Parity: none • Stop bits: 1 • Flow Control: Xon/Xoff Step 3. Use the Keyboard Configuration Panel to map the Backspace character to Control-H. Step 4. Boot the server. Step 5. Run PuTTY and press Enter. The MP prompt is displayed. 20 Chapter 2
-
 1
1 -
2
-
3
-
4
-
5
-
6
-
7
-
8
-
9
-
10
-
11
-
12
-
13
-
14
-
 15
15 -
 16
16 -
 17
17 -
 18
18 -
 19
19 -
 20
20 -
 21
21 -
 22
22 -
 23
23 -
 24
24 -
 25
25 -
26
-
27
-
28
-
29
-
30
-
31
-
32
-
33
-
34
-
35
-
36
-
37
-
38
-
39
-
40
-
41
-
42
-
43
-
44
-
45
-
46
-
47
-
48
-
49
-
50
-
51
-
52
-
53
-
54
-
55
-
56
-
57
-
58
-
59
-
60
-
61
-
62
 |
 |