HP LaserJet 1010 Service Manual - Page 37
Cleaning the product, Cleaning the print path, WARNING, CAUTION
 |
View all HP LaserJet 1010 manuals
Add to My Manuals
Save this manual to your list of manuals |
Page 37 highlights
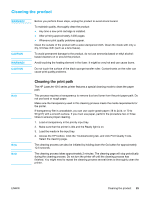
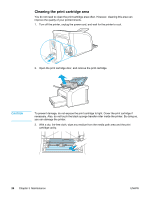
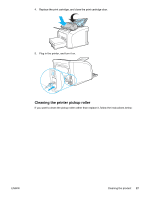
Cleaning the product WARNING! CAUTION WARNING! CAUTION Before you perform these steps, unplug the product to avoid shock hazard. To maintain quality, thoroughly clean the product: ● Any time a new print cartridge is installed. ● After printing approximately 2,000 pages. ● Whenever print quality problems appear. Clean the outside of the product with a water-dampened cloth. Clean the inside with only a dry, lint-free cloth (such as a lens tissue). To avoid permanent damage to the product, do not use ammonia-based or ethyl alcoholbased cleaners on or around the product. Avoid touching the heating element in the fuser. It might be very hot and can cause burns. Do not touch the surface of the black sponge transfer roller. Contaminants on the roller can cause print quality problems. Note Note Note Cleaning the print path The HP LaserJet 1010 series printer features a special cleaning mode to clean the paper path. This process requires a transparency to remove dust and toner from the print paper path. Do not use bond or rough paper. Make sure the transparency used in this cleaning process meets the media requirements for the printer. If transparency film is unavailable, you can use copier grade paper (18 to 24 lb. or 70 to 90 g/m2) with a smooth surface. If you must use paper, perform the procedure two or three times to ensure proper cleaning. 1. Load a transparency in the priority input tray. 2. Make sure that the printer is idle and the Ready light is on. 3. Load the media in the input tray. 4. Access the HP toolbox. Click the Troubleshooting tab, and click Print Quality Tools. Select the cleaning page. The cleaning process can also be initiated by holding down the Go button for approximately 12.5 seconds. The cleaning process takes approximately 2 minutes. The cleaning page will stop periodically during the cleaning process. Do not turn the printer off until the cleaning process has finished. You might need to repeat the cleaning process several times to thoroughly clean the printer. ENWW Cleaning the product 25
-
 1
1 -
2
-
3
-
4
-
5
-
6
-
7
-
8
-
9
-
10
-
11
-
12
-
13
-
14
-
15
-
16
-
17
-
18
-
19
-
20
-
21
-
22
-
23
-
24
-
25
-
26
-
27
-
28
-
29
-
30
-
31
-
 32
32 -
 33
33 -
 34
34 -
 35
35 -
 36
36 -
 37
37 -
 38
38 -
 39
39 -
 40
40 -
 41
41 -
 42
42 -
43
-
44
-
45
-
46
-
47
-
48
-
49
-
50
-
51
-
52
-
53
-
54
-
55
-
56
-
57
-
58
-
59
-
60
-
61
-
62
-
63
-
64
-
65
-
66
-
67
-
68
-
69
-
70
-
71
-
72
-
73
-
74
-
75
-
76
-
77
-
78
-
79
-
80
-
81
-
82
-
83
-
84
-
85
-
86
-
87
-
88
-
89
-
90
-
91
-
92
-
93
-
94
-
95
-
96
-
97
-
98
-
99
-
100
-
101
-
102
-
103
-
104
-
105
-
106
-
107
-
108
-
109
-
110
-
111
-
112
-
113
-
114
-
115
-
116
-
117
-
118
-
119
-
120
-
121
-
122
-
123
-
124
-
125
-
126
-
127
-
128
-
129
-
130
-
131
-
132
-
133
-
134
-
135
-
136
-
137
-
138
-
139
-
140
-
141
-
142
-
143
-
144
-
145
-
146
-
147
-
148
 |
 |
