HP LaserJet 1010 Service Manual - Page 89
Removing the ECU assembly 3 of 5
 |
View all HP LaserJet 1010 manuals
Add to My Manuals
Save this manual to your list of manuals |
Page 89 highlights
5. Open the print cartridge access door. 6. Remove the front cover. 7. Remove four screws (callout 1, figure 5-27). 1 Figure 5-27. Removing the ECU assembly (3 of 5) 8. Lift the ECU cover up just enough to free it and tilt it back as far as it will easily go. 9. Two sheet metal hook hinges (one on each side) secure the cover. Figure 5-28. Removing the ECU assembly (4 of 5) 10. Push both hooks free with a screwdriver to remove the ECU cover. ENWW Internal assemblies 77
-
 1
1 -
2
-
3
-
4
-
5
-
6
-
7
-
8
-
9
-
10
-
11
-
12
-
13
-
14
-
15
-
16
-
17
-
18
-
19
-
20
-
21
-
22
-
23
-
24
-
25
-
26
-
27
-
28
-
29
-
30
-
31
-
32
-
33
-
34
-
35
-
36
-
37
-
38
-
39
-
40
-
41
-
42
-
43
-
44
-
45
-
46
-
47
-
48
-
49
-
50
-
51
-
52
-
53
-
54
-
55
-
56
-
57
-
58
-
59
-
60
-
61
-
62
-
63
-
64
-
65
-
66
-
67
-
68
-
69
-
70
-
71
-
72
-
73
-
74
-
75
-
76
-
77
-
78
-
79
-
80
-
81
-
82
-
83
-
 84
84 -
 85
85 -
 86
86 -
 87
87 -
 88
88 -
 89
89 -
 90
90 -
 91
91 -
 92
92 -
 93
93 -
 94
94 -
95
-
96
-
97
-
98
-
99
-
100
-
101
-
102
-
103
-
104
-
105
-
106
-
107
-
108
-
109
-
110
-
111
-
112
-
113
-
114
-
115
-
116
-
117
-
118
-
119
-
120
-
121
-
122
-
123
-
124
-
125
-
126
-
127
-
128
-
129
-
130
-
131
-
132
-
133
-
134
-
135
-
136
-
137
-
138
-
139
-
140
-
141
-
142
-
143
-
144
-
145
-
146
-
147
-
148
 |
 |

5.
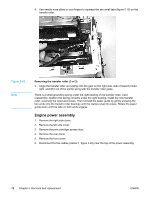
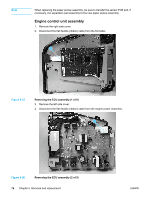
Open the print cartridge access door.
6.
Remove the front cover.
7.
Remove four screws (callout 1, figure 5-27).
1
Figure 5-27.
Removing the ECU assembly (3 of 5)
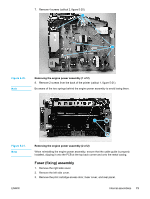
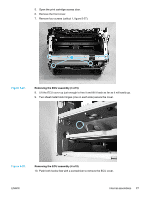
8.
Lift the ECU cover up just enough to free it and tilt it back as far as it will easily go.
9.
Two sheet metal hook hinges (one on each side) secure the cover.
Figure 5-28.
Removing the ECU assembly (4 of 5)
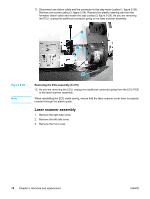
10.
Push both hooks free with a screwdriver to remove the ECU cover.
ENWW
Internal assemblies
77