HP LaserJet 1010 Service Manual - Page 81
Removing the front cover 3 of 3
 |
View all HP LaserJet 1010 manuals
Add to My Manuals
Save this manual to your list of manuals |
Page 81 highlights
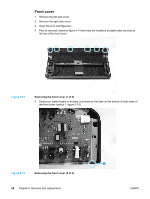
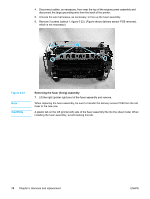
6. With the bottom of the front cover released, pull up and back at the top while gently rocking to release all tabs at the top to remove the front cover. Figure 5-16. Note Removing the front cover (3 of 3) 7. Remove the front cover. When reassembling, make sure the tabs on the top of the front cover are in place and secure then press the bottom of the front cover into place. ENWW Covers 69
-
 1
1 -
2
-
3
-
4
-
5
-
6
-
7
-
8
-
9
-
10
-
11
-
12
-
13
-
14
-
15
-
16
-
17
-
18
-
19
-
20
-
21
-
22
-
23
-
24
-
25
-
26
-
27
-
28
-
29
-
30
-
31
-
32
-
33
-
34
-
35
-
36
-
37
-
38
-
39
-
40
-
41
-
42
-
43
-
44
-
45
-
46
-
47
-
48
-
49
-
50
-
51
-
52
-
53
-
54
-
55
-
56
-
57
-
58
-
59
-
60
-
61
-
62
-
63
-
64
-
65
-
66
-
67
-
68
-
69
-
70
-
71
-
72
-
73
-
74
-
75
-
 76
76 -
 77
77 -
 78
78 -
 79
79 -
 80
80 -
 81
81 -
 82
82 -
 83
83 -
 84
84 -
 85
85 -
 86
86 -
87
-
88
-
89
-
90
-
91
-
92
-
93
-
94
-
95
-
96
-
97
-
98
-
99
-
100
-
101
-
102
-
103
-
104
-
105
-
106
-
107
-
108
-
109
-
110
-
111
-
112
-
113
-
114
-
115
-
116
-
117
-
118
-
119
-
120
-
121
-
122
-
123
-
124
-
125
-
126
-
127
-
128
-
129
-
130
-
131
-
132
-
133
-
134
-
135
-
136
-
137
-
138
-
139
-
140
-
141
-
142
-
143
-
144
-
145
-
146
-
147
-
148
 |
 |

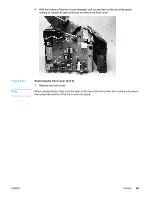
6.
With the bottom of the front cover released, pull up and back at the top while gently
rocking to release all tabs at the top to remove the front cover.
Figure 5-16.
Removing the front cover (3 of 3)
7.
Remove the front cover.
Note
When reassembling, make sure the tabs on the top of the front cover are in place and secure
then press the bottom of the front cover into place.
ENWW
Covers
69