HP LaserJet 4300 HP LaserJet 4200 and 4300 printers - Software Technical Refer - Page 84
Ignore Application Collation, Automatic configuration, Printer image
 |
View all HP LaserJet 4300 manuals
Add to My Manuals
Save this manual to your list of manuals |
Page 84 highlights
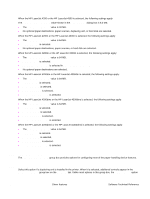
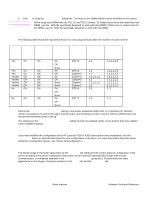
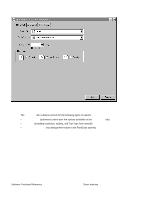
8 Click OK to close the Add Font DIMM dialog box. The fonts on the DIMM should now be available on the system. Note When using font DIMMs with the PCL 5e and PCL 6 drivers: To install screen fonts that match the font DIMM, use the .HPB file specifically designed to work with that DIMM. If there are no screen fonts for the DIMM, use the .PCM file specifically designed to work with that DIMM. Ignore Application Collation The following table shows the expected behavior for a two-page print job when the number of copies is three. Table 12: Printer behavior with Ignore Application Collation settings Hard disk Mopier Ignore Application Commands Pages sent to on printer Enabled Application Collation sent by printer printer check box Collation check box in check box Print dialog box Yes On On On QTY=3 1,2 Off Yes On On Yes On Off Yes/No Off Off Yes/No Off Off Yes/No Off Off Yes/No Off Off No On On None On Off On Off None None On QTY=3 Copies=3 Copies=1 Copies=3 Copies=1 Copies=3 QTY=3 1,2 1,2 1,2,1,2,1,2 1,2 1,2,1,2,1,2 1,2 1,2 Off No On Off None On QTY=3 1,2 Off None Pages output from printer 1,2,1,2,1,2 1,2,1,2,1,2 1,1,1,2,2,2 1,2,1,2,1,2 1,1,1,2,2,2 1,2,1,2,1,2 1,1,1,2,2,2 1, 2 1, 2 Placing the Ignore Application Collation setting in the printer properties means that, on a Windows NT network, clients connecting to the printer through a network share cannot change its value; only the network administrator can decide how the printer driver is set up. You cannot use the Ignore Application Collation setting to print non-collated copies. If you want to print non-collated copies, disable mopying. Automatic configuration If you have modified the configuration of the HP LaserJet 4200 or 4300 series printer since installation, click the Update Now button to automatically reflect the new configuration in the driver. For more information about the Driver Automatic Configuration feature, see "Driver Autoconfiguration." Printer image The bitmap image in the lower-right portion of the Configure tab represents the current physical configuration of the printer according to the driver configuration data (which can be obtained automatically through bidirectional communication, or configured manually in the Paper-Handling Options group box). It should have the same appearance as the image in the same location on the Paper tab and the Destination tab. 82 Driver features Software Technical Reference
-
 1
1 -
2
-
3
-
4
-
5
-
6
-
7
-
8
-
9
-
10
-
11
-
12
-
13
-
14
-
15
-
16
-
17
-
18
-
19
-
20
-
21
-
22
-
23
-
24
-
25
-
26
-
27
-
28
-
29
-
30
-
31
-
32
-
33
-
34
-
35
-
36
-
37
-
38
-
39
-
40
-
41
-
42
-
43
-
44
-
45
-
46
-
47
-
48
-
49
-
50
-
51
-
52
-
53
-
54
-
55
-
56
-
57
-
58
-
59
-
60
-
61
-
62
-
63
-
64
-
65
-
66
-
67
-
68
-
69
-
70
-
71
-
72
-
73
-
74
-
75
-
76
-
77
-
78
-
 79
79 -
 80
80 -
 81
81 -
 82
82 -
 83
83 -
 84
84 -
 85
85 -
 86
86 -
 87
87 -
 88
88 -
 89
89 -
90
-
91
-
92
-
93
-
94
-
95
-
96
-
97
-
98
-
99
-
100
-
101
-
102
-
103
-
104
-
105
-
106
-
107
-
108
-
109
-
110
-
111
-
112
-
113
-
114
-
115
-
116
-
117
-
118
-
119
-
120
-
121
-
122
-
123
-
124
-
125
-
126
-
127
-
128
-
129
-
130
-
131
-
132
-
133
-
134
-
135
-
136
-
137
-
138
-
139
-
140
-
141
-
142
-
143
-
144
-
145
-
146
-
147
-
148
-
149
-
150
-
151
-
152
-
153
-
154
-
155
-
156
-
157
-
158
-
159
-
160
-
161
-
162
-
163
-
164
-
165
-
166
-
167
-
168
-
169
-
170
-
171
-
172
-
173
-
174
-
175
-
176
-
177
-
178
-
179
-
180
-
181
-
182
-
183
-
184
-
185
-
186
-
187
-
188
-
189
-
190
-
191
-
192
-
193
-
194
-
195
-
196
-
197
-
198
-
199
-
200
-
201
-
202
-
203
-
204
 |
 |
