HP LaserJet Enterprise MFP M630 User Guide 1 - Page 85
Create a Quick Set
 |
View all HP LaserJet Enterprise MFP M630 manuals
Add to My Manuals
Save this manual to your list of manuals |
Page 85 highlights
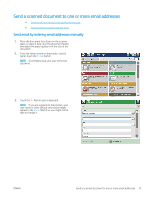
Create a Quick Set Use the Quick Sets feature to quickly access preset job options. The product administrator can use the HP Embedded Web Server to create Quick Sets, which are then available in the Quick Sets menu from the control-panel Home screen. Quick Sets are available for the following scan/send features: ● E-mail ● Save to Network Folder ● Save to USB ● Save to SharePoint® Ask the system administrator for assistance with the following steps: 1. Open the HP Embedded Web Server (EWS): a. From the Home screen on the product control panel, touch the Network button to display the IP address or host name. b. Open a Web browser, and in the address line, type the IP address or host name exactly as it displays on the product control panel. Press the Enter key on the computer keyboard. The EWS opens. 2. Click the General tab. 3. On the left navigation pane, click the Quick Sets Setup link. 4. On the Quick Sets dialog, click Add. 5. On the Select an application dialog, select the application for which you want to create a Quick Set. Click Next. 6. On the Set the button location for the Quick Set and options for user interaction at the control panel dialog, provide the following information: ● Quick Set Title: This title appears on the new Quick Set button on the product control panel. ● Quick Set Description: This short description appears next to the title on the new Quick Set button on the control panel. ● Button Location: Select whether the new Quick Set button will be directly on the Home screen or within the Quick Sets application on the control panel. ● Quick Set Start Option: Select one of these options: ○ Enter application, then user presses Start: The product opens the scan application for the Quick Set, so you can review and change the settings before pressing the Start button to begin the job. ○ Start instantly upon selection: The job starts instantly when you touch the Quick Set button. Click Next. 7. The next several dialogs that appear depend on which application you selected in Step 5: ENWW Create a Quick Set 73
-
 1
1 -
2
-
3
-
4
-
5
-
6
-
7
-
8
-
9
-
10
-
11
-
12
-
13
-
14
-
15
-
16
-
17
-
18
-
19
-
20
-
21
-
22
-
23
-
24
-
25
-
26
-
27
-
28
-
29
-
30
-
31
-
32
-
33
-
34
-
35
-
36
-
37
-
38
-
39
-
40
-
41
-
42
-
43
-
44
-
45
-
46
-
47
-
48
-
49
-
50
-
51
-
52
-
53
-
54
-
55
-
56
-
57
-
58
-
59
-
60
-
61
-
62
-
63
-
64
-
65
-
66
-
67
-
68
-
69
-
70
-
71
-
72
-
73
-
74
-
75
-
76
-
77
-
78
-
79
-
 80
80 -
 81
81 -
 82
82 -
 83
83 -
 84
84 -
 85
85 -
 86
86 -
 87
87 -
 88
88 -
 89
89 -
 90
90 -
91
-
92
-
93
-
94
-
95
-
96
-
97
-
98
-
99
-
100
-
101
-
102
-
103
-
104
-
105
-
106
-
107
-
108
-
109
-
110
-
111
-
112
-
113
-
114
-
115
-
116
-
117
-
118
-
119
-
120
-
121
-
122
-
123
-
124
-
125
-
126
-
127
-
128
-
129
-
130
-
131
-
132
-
133
-
134
-
135
-
136
-
137
-
138
-
139
-
140
-
141
-
142
-
143
-
144
-
145
-
146
-
147
-
148
-
149
-
150
-
151
-
152
-
153
-
154
-
155
-
156
-
157
-
158
-
159
-
160
-
161
-
162
-
163
-
164
-
165
-
166
-
167
-
168
-
169
-
170
-
171
-
172
-
173
-
174
-
175
-
176
-
177
-
178
-
179
-
180
-
181
-
182
-
183
-
184
-
185
-
186
-
187
-
188
-
189
-
190
-
191
-
192
-
193
-
194
-
195
-
196
-
197
-
198
-
199
-
200
-
201
-
202
-
203
-
204
-
205
-
206
-
207
-
208
-
209
-
210
-
211
-
212
-
213
-
214
-
215
-
216
 |
 |
