HP LaserJet Pro CM1415 HP LaserJet Pro CM1410 - User Guide - Page 236
Yellow Cartridge Low, Settings cleared
 |
View all HP LaserJet Pro CM1415 manuals
Add to My Manuals
Save this manual to your list of manuals |
Page 236 highlights
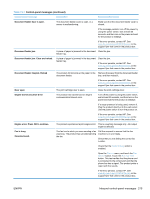
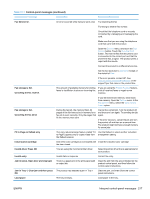
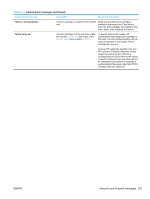
Table 13-1 Control-panel messages (continued) Control panel message Description Recommended action No fax detected. The product answered the incoming call but did not detect that a fax machine was calling. Allow the product to retry receiving the fax. Open the Service menu, and touch the Fax Service button. Touch the Run Fax Test button. This test verifies that the phone cord is connected to the correct port and that the phone line has a signal. The product prints a report with the results. If the error persists, contact HP. See www.hp.com/support/CM1410series or the support flyer that came in the product box. Print failure, press OK. If error repeats, turn off then on. The product could not print the current page Touch the OK button to clear the message. because of its complexity. Replace [color] The print cartridge is at the end of its useful life, and the At Very Low menu item in the System Setup menu is set to Stop. To ensure optimal print quality, HP recommends replacing the print cartridge at this point. You can continue printing until you notice a decrease in print quality. Actual cartridge life may vary. Once an HP supply has reached "very low", HP's premium Protection Warranty on that supply has ended. All print defects or cartridge failures incurred when an HP supply is used in continue at very low mode will not be considered to be defects in materials or workmanship in the supply under the HP Print Cartridge Warranty Statement. Scanner error #, Turn off then on The product has experienced an error in the Turn off the power by using the power switch, scanner sub-assembly area. wait at least 30 seconds, and then turn on the power and wait for the product to initialize. Do not open the scanner lid until the initialization process is complete. If a surge protector is being used, remove it. Plug the product directly into the wall socket. Use the power switch to turn the product on. If the error persists, contact HP. See www.hp.com/support/CM1410series or the support flyer that came in the product box. Scanner reserved for PC scan A computer is using the product to create a scan. Wait until the computer scan has finished, or cancel the scan from the computer software, or touch the Cancel button. Scanning error Cannot connect The product cannot transmit scan information Verify that the connection cable is not loose to a computer. or damaged. Replace the cable if necessary, and try the scan again. Settings cleared The product has cleared job settings. Re-enter any appropriate job settings. Used [color] installed, to accept press OK A used color printer cartridge has been installed or moved. Touch the OK button to return to the Ready state. Yellow Cartridge Low The print cartridge is nearing the end of its Printing can continue, but consider having a useful life. replacement supply on hand. 220 Chapter 13 Solve problems ENWW
-
 1
1 -
2
-
3
-
4
-
5
-
6
-
7
-
8
-
9
-
10
-
11
-
12
-
13
-
14
-
15
-
16
-
17
-
18
-
19
-
20
-
21
-
22
-
23
-
24
-
25
-
26
-
27
-
28
-
29
-
30
-
31
-
32
-
33
-
34
-
35
-
36
-
37
-
38
-
39
-
40
-
41
-
42
-
43
-
44
-
45
-
46
-
47
-
48
-
49
-
50
-
51
-
52
-
53
-
54
-
55
-
56
-
57
-
58
-
59
-
60
-
61
-
62
-
63
-
64
-
65
-
66
-
67
-
68
-
69
-
70
-
71
-
72
-
73
-
74
-
75
-
76
-
77
-
78
-
79
-
80
-
81
-
82
-
83
-
84
-
85
-
86
-
87
-
88
-
89
-
90
-
91
-
92
-
93
-
94
-
95
-
96
-
97
-
98
-
99
-
100
-
101
-
102
-
103
-
104
-
105
-
106
-
107
-
108
-
109
-
110
-
111
-
112
-
113
-
114
-
115
-
116
-
117
-
118
-
119
-
120
-
121
-
122
-
123
-
124
-
125
-
126
-
127
-
128
-
129
-
130
-
131
-
132
-
133
-
134
-
135
-
136
-
137
-
138
-
139
-
140
-
141
-
142
-
143
-
144
-
145
-
146
-
147
-
148
-
149
-
150
-
151
-
152
-
153
-
154
-
155
-
156
-
157
-
158
-
159
-
160
-
161
-
162
-
163
-
164
-
165
-
166
-
167
-
168
-
169
-
170
-
171
-
172
-
173
-
174
-
175
-
176
-
177
-
178
-
179
-
180
-
181
-
182
-
183
-
184
-
185
-
186
-
187
-
188
-
189
-
190
-
191
-
192
-
193
-
194
-
195
-
196
-
197
-
198
-
199
-
200
-
201
-
202
-
203
-
204
-
205
-
206
-
207
-
208
-
209
-
210
-
211
-
212
-
213
-
214
-
215
-
216
-
217
-
218
-
219
-
220
-
221
-
222
-
223
-
224
-
225
-
226
-
227
-
228
-
229
-
230
-
 231
231 -
 232
232 -
 233
233 -
 234
234 -
 235
235 -
 236
236 -
 237
237 -
 238
238 -
 239
239 -
 240
240 -
 241
241 -
242
-
243
-
244
-
245
-
246
-
247
-
248
-
249
-
250
-
251
-
252
-
253
-
254
-
255
-
256
-
257
-
258
-
259
-
260
-
261
-
262
-
263
-
264
-
265
-
266
-
267
-
268
-
269
-
270
-
271
-
272
-
273
-
274
-
275
-
276
-
277
-
278
-
279
-
280
-
281
-
282
-
283
-
284
-
285
-
286
-
287
-
288
-
289
-
290
-
291
-
292
-
293
-
294
-
295
-
296
-
297
-
298
-
299
-
300
-
301
-
302
-
303
-
304
-
305
-
306
-
307
-
308
 |
 |