HP Latex 260 Maintenance and troubleshooting guide - Page 89
Numeric error messages continued, Error code, Recommendation, RIP while printing
 |
View all HP Latex 260 manuals
Add to My Manuals
Save this manual to your list of manuals |
Page 89 highlights
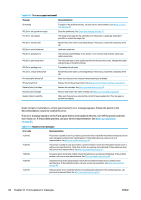
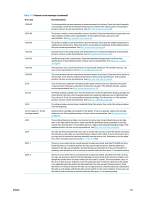
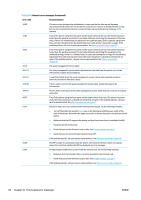
Table 10-2 Numeric error messages (continued) Error code Recommendation 63:05 The job is reaching the printer too slowly. The printer cancels the job if there are long pauses of more than 20 s. Try the following remedies: ● Make sure that a 1 Gigabit Ethernet card is correctly installed in the computer with the RIP. ● Check the RIP for any error messages. Check that the computer with the RIP is working correctly and has the minimum specification required by the RIP. Check that the hard disk is neither full nor excessively fragmented. ● Check whether the option RIP while printing is enabled. This option can cause slow printing if the computer is not sufficiently powerful. ● Try reducing the resolution of the job or increasing the number of passes. 73:03 Turn off the printer using the front panel and the power switch at the rear. Disconnect the power cords. Reconnect the power cords and turn the printer on again. Check that the printer has the latest firmware version. If not, update the firmware to the latest version. If the problem persists, call your service representative. See When you need help on page 85. 74:01 An error occurred when uploading the firmware update file. Try the following remedies: ● Turn off the printer by using the Power key on the front panel and the power switch at the back of the printer. Disconnect the power cord, then reconnect the power cord and turn on the printer. ● Try again to upload the firmware update file to the printer. See Firmware update on page 9. If the problem persists, call your service representative. See When you need help on page 85. 76:03 A "disk out of space" has occurred. Try the following remedies: ● Turn off the printer by using the Power key on the front panel and the power switch at the back of the printer. Disconnect the power cord, then reconnect the power cord and turn on the printer. ● Resubmit the file to the printer. If the problem persists, call your service representative. See When you need help on page 85. 77:04 An Embedded Web Server internal software error has occurred. Try the following remedies: ● Turn off the printer by using the Power key on the front panel and the power switch at the back of the printer. Disconnect the power cord, then reconnect the power cord and turn on the printer. ● Check that your printer firmware is up to date. See Firmware update on page 9. If the problem persists, call your service representative. See When you need help on page 85. 78.1:04 The printer has no substrate preset for this substrate. Follow the firmware upgrade procedure to update the printer with the latest substrate presets. 78.2:01 The end of roll has been detected. If this is not the case, unload and reload the substrate. 81:01, 81:03 Open the printer window and make sure that there are no obstacles restricting the movement of the drive roller. If the substrate has jammed and is restricting the movement of the drive roller, see The substrate has jammed on page 64. If the problem persists, call your service representative. See When you need help on page 85. 82:01 There may be a substrate jam, or a dirty carriage reflector. Try cleaning the carriage reflector; if the problem persists, see The substrate has jammed on page 64. 86:01 Open the window and check for any visible obstacles restricting the movement of the printhead carriage. If there is a wrinkled mass of substrate blocking the carriage, lift the substrate adjustment lever and clear the obstruction. If the problem persists, call your service representative. See When you need help on page 85. 98:03 One or more printheads is malfunctioning; use the printhead status plot to find out which. See Use the printhead status plot on page 53. ENWW 83
-
 1
1 -
2
-
3
-
4
-
5
-
6
-
7
-
8
-
9
-
10
-
11
-
12
-
13
-
14
-
15
-
16
-
17
-
18
-
19
-
20
-
21
-
22
-
23
-
24
-
25
-
26
-
27
-
28
-
29
-
30
-
31
-
32
-
33
-
34
-
35
-
36
-
37
-
38
-
39
-
40
-
41
-
42
-
43
-
44
-
45
-
46
-
47
-
48
-
49
-
50
-
51
-
52
-
53
-
54
-
55
-
56
-
57
-
58
-
59
-
60
-
61
-
62
-
63
-
64
-
65
-
66
-
67
-
68
-
69
-
70
-
71
-
72
-
73
-
74
-
75
-
76
-
77
-
78
-
79
-
80
-
81
-
82
-
83
-
 84
84 -
 85
85 -
 86
86 -
 87
87 -
 88
88 -
 89
89 -
 90
90 -
 91
91 -
 92
92 -
 93
93 -
 94
94 -
95
-
96
 |
 |
