HP M3035 HP LaserJet MFP - Analog Fax Accessory 300 Send Fax Driver - Page 14
Verifying that the MFP e-mail feature is con d (optional) - laserjet mfp series
 |
UPC - 883585038466
View all HP M3035 manuals
Add to My Manuals
Save this manual to your list of manuals |
Page 14 highlights
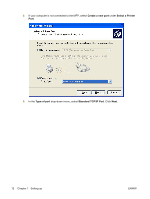
f. Click Save. g. After the file has been downloaded, close the File Download dialog box, if necessary. 5. Install the downloaded firmware file. See the appropriate MFP user guide for instructions about installing the remote firmware update (RFU): ● HP LaserJet M3035MFP and M3037MFP Series User Guide ● HP LaserJet M4345MFP User Guide ● HP LaserJet M5025MFP and M5035MFP User Guide Verifying that the MFP e-mail feature is configured (optional) Configure e-mail function on the MFP in order to receive an e-mail notification when a fax has been sent by using the MFP Send Fax driver. NOTE: The e-mail notification feature is optional. See the appropriate MFP user guide for instructions about configuring the e-mail function: ● HP LaserJet 4345mfp Series User Guide ● HP Color LaserJet 4730mfp User Guide ● HP LaserJet 9040mfp/9050mfp User Guide ● HP Color LaserJet 9500mfp User Guide ● HP LaserJet M3035MFP and M3037MFP Series User Guide ● HP LaserJet M3037MFP User Guide ● HP LaserJet M4345MFP User Guide ● HP LaserJet M5025MFP and M5035MFP User Guide Configuring the billing-code feature (optional) HP MFP Send Fax supports the use of billing codes when sending faxes. NOTE: The billing-code feature is optional. Enable the billing-code feature on the HP LaserJet 4345mfp and 9040/9050mfp and the HP Color LaserJet 4730mfp and 9500mfp: 1. On the MFP control panel, press Menu. 2. Scroll to and touch FAX. 3. Scroll to and touch FAX SEND. 4. Scroll to and touch BILLING CODE. 5. Touch CUSTOM to open the billing-code screen. 6. Use the up and down arrows to select the minimum number of digits in the billing code. 7. Touch OK to enable the billing-code feature or touch OFF to disable the billing-code feature. 8 Chapter 1 Setting up ENWW
-
 1
1 -
2
-
3
-
4
-
5
-
6
-
7
-
8
-
 9
9 -
 10
10 -
 11
11 -
 12
12 -
 13
13 -
 14
14 -
 15
15 -
 16
16 -
 17
17 -
 18
18 -
 19
19 -
20
-
21
-
22
-
23
-
24
-
25
-
26
-
27
-
28
-
29
-
30
-
31
-
32
-
33
-
34
-
35
-
36
-
37
-
38
-
39
-
40
-
41
-
42
-
43
-
44
-
45
-
46
-
47
-
48
-
49
-
50
-
51
-
52
-
53
-
54
-
55
-
56
-
57
-
58
-
59
-
60
-
61
-
62
-
63
-
64
-
65
-
66
-
67
-
68
-
69
-
70
-
71
-
72
-
73
-
74
-
75
-
76
-
77
-
78
-
79
-
80
-
81
-
82
-
83
-
84
-
85
-
86
-
87
-
88
 |
 |
