HP M3035 HP LaserJet MFP - Analog Fax Accessory 300 Send Fax Driver - Page 15
Installing the driver, Start, Settings, Printers and Faxes, Printer Tasks, Add a printer - laserjet m3035mfp printer
 |
UPC - 883585038466
View all HP M3035 manuals
Add to My Manuals
Save this manual to your list of manuals |
Page 15 highlights
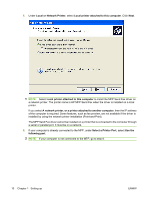
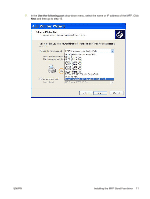
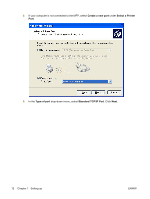
NOTE: If the billing-code feature is enabled on the MFP, a billing-code entry is required for walkup fax jobs sent from the MFP. Enable the billing code on the HP LaserJet M3035MFP, M3027MFP, M4345MFP, M5025MFP, M5035 MFP, and HP Color LaserJet CM4730 MFP and CM6040 MFP: 1. On the MFP control panel, touch Administration. 2. Scroll to and touch Initial Setup. 3. Scroll to and touch Fax Setup. 4. Scroll to and touch Fax Send Settings. 5. Scroll to and touch Billing Codes. 6. Touch Custom to open the billing-code screen. 7. Use the up and down arrows to select the minimum number of digits in the billing code. 8. Touch OK to enable the billing-code feature or touch Off to disable the billing-code feature. NOTE: If the billing-code feature is enabled on the MFP, a billing-code entry is required for walkup fax jobs sent from the MFP. Installing the driver To install the MFP Send Fax driver by using the Add a Printer wizard in Windows, use the following steps: NOTE: If using the system software CD supplied with the MFP, you can install the Send Fax driver by choosing the "CUSTOM" path. To install the driver in Windows XP 1. In Windows Explorer, double-click the downloaded MFP Send Fax driver executable file to extract the driver files. 2. Click Start, click Settings, and then click Printers and Faxes. 3. In the Printer Tasks pane in the Printers and Faxes window, click Add a printer. 4. In the Add Printer Wizard welcome dialog box, click Next. ENWW Installing the MFP Send Fax driver 9
-
 1
1 -
2
-
3
-
4
-
5
-
6
-
7
-
8
-
9
-
 10
10 -
 11
11 -
 12
12 -
 13
13 -
 14
14 -
 15
15 -
 16
16 -
 17
17 -
 18
18 -
 19
19 -
 20
20 -
21
-
22
-
23
-
24
-
25
-
26
-
27
-
28
-
29
-
30
-
31
-
32
-
33
-
34
-
35
-
36
-
37
-
38
-
39
-
40
-
41
-
42
-
43
-
44
-
45
-
46
-
47
-
48
-
49
-
50
-
51
-
52
-
53
-
54
-
55
-
56
-
57
-
58
-
59
-
60
-
61
-
62
-
63
-
64
-
65
-
66
-
67
-
68
-
69
-
70
-
71
-
72
-
73
-
74
-
75
-
76
-
77
-
78
-
79
-
80
-
81
-
82
-
83
-
84
-
85
-
86
-
87
-
88
 |
 |
