HP M3035 HP LaserJet MFP - Analog Fax Accessory 300 Send Fax Driver - Page 81
The default fields do not refresh, Changed settings do not take effect, Setup, Default Settings - m3035mfp manual
 |
UPC - 883585038466
View all HP M3035 manuals
Add to My Manuals
Save this manual to your list of manuals |
Page 81 highlights
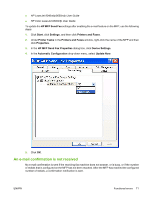
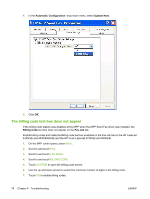
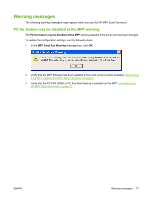
Enable billing codes and make the Billing code text box available on the Fax Job tab on the HP LaserJet M3035MFP, M3027MFP, M4345MFP, M5025MFP, M5035 MFP, and HP Color LaserJet CM4730 MFP and CM6040 MFP. 1. Touch Administration. 2. Scroll to and touch Initial Setup. 3. Scroll to and touch Fax Setup. 4. Scroll to and touch Fax Send Settings. 5. Scroll to and touch Billing Codes. 6. Touch Custom to open the billing-code screen. 7. Use the up and down arrows to select the minimum number of digits in the billing code. 8. Touch OK to enable billing codes. The default fields do not refresh The information in the sender information fields on the Setup tab is updated the first time that the sender information is entered in the sender information fields in the Default Settings dialog box. If the default sender information is changed later, the sender information fields on the Setup tab are not refreshed. The changes are saved, but the information does not appear in the dialog box. To show the new information, exit from the MFP Send Fax driver and then restart the driver. Changed settings do not take effect The MFP Send Fax driver captures MFP fax configuration information during installation. If the MFP settings are changed after the driver is installed, complete a manual update by using the Update Now feature to synchronize the driver with the MFP settings. Normally, closing and reopening the driver will automatically accomplish this process. To synchronize the driver with the MFP settings by using Update Now, use the following steps: 1. Click Start, click Settings, and then click Printers and Faxes. 2. Under Printer Tasks in the Printers and Faxes window, right-click the name of the MFP and then click Properties. 3. In the HP MFP Send Fax Properties dialog box, click Device Settings. ENWW Functional errors 75
-
 1
1 -
2
-
3
-
4
-
5
-
6
-
7
-
8
-
9
-
10
-
11
-
12
-
13
-
14
-
15
-
16
-
17
-
18
-
19
-
20
-
21
-
22
-
23
-
24
-
25
-
26
-
27
-
28
-
29
-
30
-
31
-
32
-
33
-
34
-
35
-
36
-
37
-
38
-
39
-
40
-
41
-
42
-
43
-
44
-
45
-
46
-
47
-
48
-
49
-
50
-
51
-
52
-
53
-
54
-
55
-
56
-
57
-
58
-
59
-
60
-
61
-
62
-
63
-
64
-
65
-
66
-
67
-
68
-
69
-
70
-
71
-
72
-
73
-
74
-
75
-
 76
76 -
 77
77 -
 78
78 -
 79
79 -
 80
80 -
 81
81 -
 82
82 -
 83
83 -
 84
84 -
 85
85 -
 86
86 -
87
-
88
 |
 |
