HP ML115 HP ProLiant ML115 Generation 5 Server Installation Sheet - Page 3
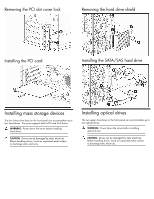
Installing mass storage devices, Installing optical drives
 |
UPC - 884962252765
View all HP ML115 manuals
Add to My Manuals
Save this manual to your list of manuals |
Page 3 highlights
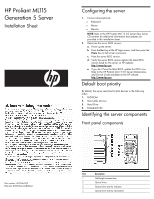
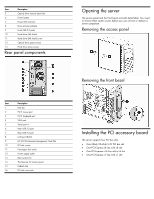
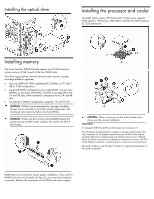
Removing the PCI slot cover lock Removing the hard drive shield Installing the PCI card Installing the SATA/SAS hard drive Installing mass storage devices The four lower drive bays on the front panel can accommodate up to four hard drives. The server supports both SATA and SAS drives. WARNING: Power down the server before installing hard drives. CAUTION: Drives can be damaged by static electricity. Before handling drives, touch an unpainted metal surface to discharge static electricity. Installing optical drives The two upper drive bays on the front panel can accommodate up to two optical drives. WARNING: Power down the server before installing optical drives. CAUTION: Drives can be damaged by static electricity. Before handling drives, touch an unpainted metal surface to discharge static electricity.
-
 1
1 -
 2
2 -
 3
3 -
 4
4
 |
 |
