HP ML530 Upgrading to Microsoft Windows Server 2003 with Service Pack 1 on Pro - Page 9
Manual install, Disconnect the SCSI cable from the redundant Host Bus Adapter HBA.
 |
UPC - 720591250669
View all HP ML530 manuals
Add to My Manuals
Save this manual to your list of manuals |
Page 9 highlights
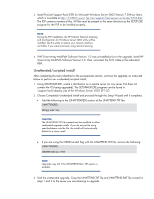
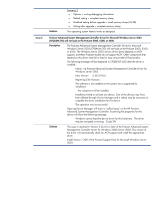
• Select Add/Remove Programs. • Select Compaq Smart Array Redundancy Filter Driver from the list of components. • Click the Change/Remove button. • Click the OK button. • Click the Cancel button. • Shut down the server. • Disconnect the SCSI cable from the redundant Host Bus Adapter (HBA). 6. Choose either of the following installation paths and proceed to the associated section to complete the upgrade: • Manual install • Unattended/scripted install Manual install After completing the tasks identified in the prerequisites section, continue the upgrade, as follows, to perform a manual install: 1. Insert the Windows Server 2003 with Service Pack 1 CD into CD-ROM drive to begin installation. Follow all instructions for upgrading the server. 2. When prompted, choose to download updated setup files from Microsoft. You will then get two yellow bangs (which is expected and should not halt the upgrade from going forward). One message tells you that Internet Information Services (IIS) is going to be disabled during the upgrade, and the other message is for the Fax service. The upgrade proceeds through copying the install files, and then reboots the server. The install continues smoothly through the following phases: preparing installation, installing Windows, and installing devices. If you have Compaq Network Teaming installed, see the information below: • During the Installing Network phase, the installation stops (approximately with 32 minutes left of the install to complete) and a dialog pops up specifying Insert Disk (see actual message below). Please insert the compact Disk labeled 'Compaq Network Teaming Disk' into your CD-ROM and then click 'OK'. • When dialog pops up, click Cancel for the installation to proceed. After this point, the installation proceeds uninterrupted until it is complete. 9
-
 1
1 -
2
-
3
-
 4
4 -
 5
5 -
 6
6 -
 7
7 -
 8
8 -
 9
9 -
 10
10 -
 11
11 -
 12
12 -
 13
13 -
 14
14 -
15
 |
 |