HP Officejet Pro 3620 Getting Started Guide - Page 4
Use fax - review
 |
View all HP Officejet Pro 3620 manuals
Add to My Manuals
Save this manual to your list of manuals |
Page 4 highlights
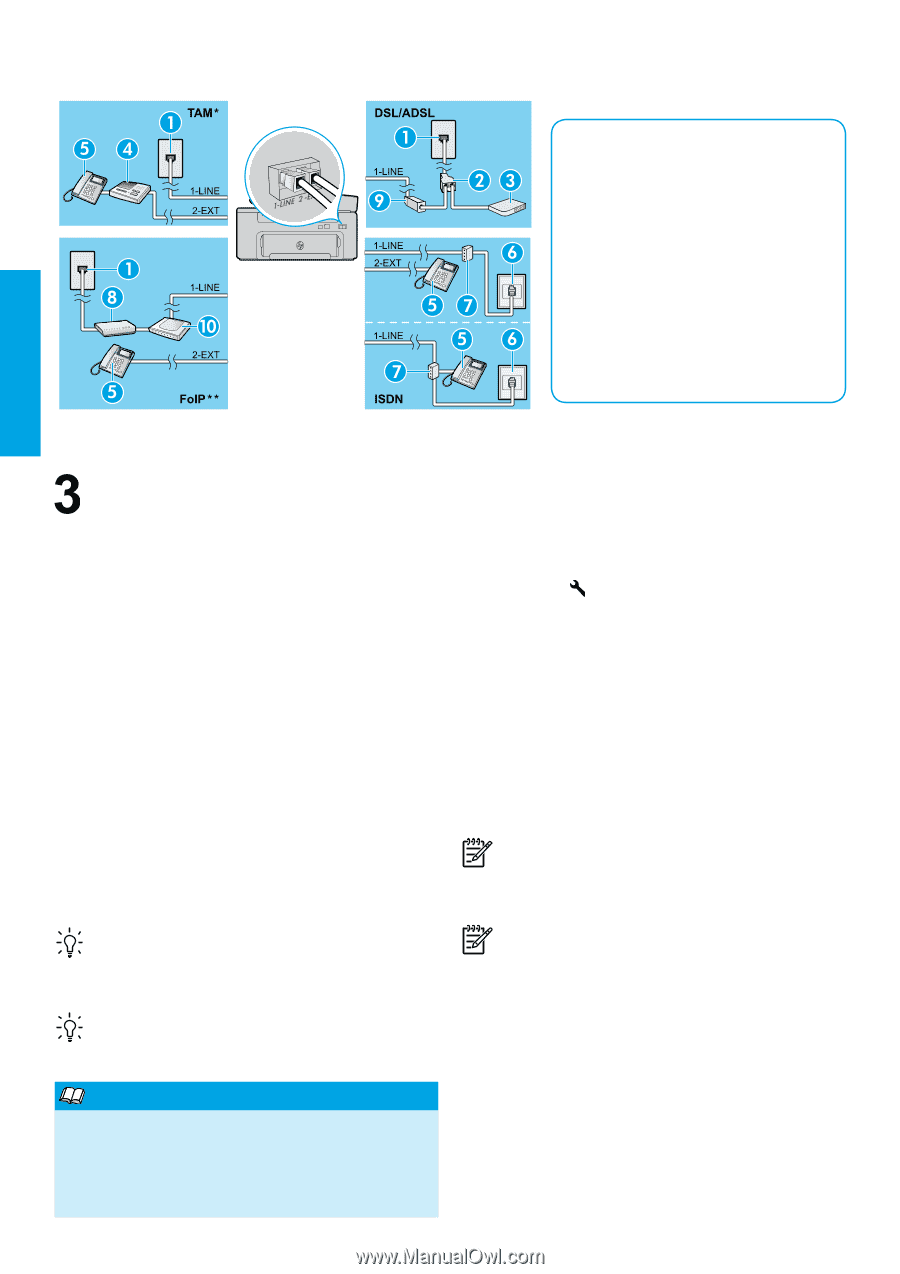
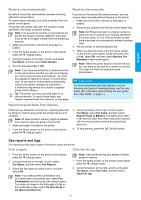
Connecting additional devices If you have other devices to connect, connect them as shown in the diagram below: English 1. Phone wall jack 2. Parallel splitter 3. DSL/ADSL modem 4. Telephone answering machine 5. Telephone 6. ISDN wall jack 7. Terminal adapter or ISDN router 8. Broadband modem 9. DSL/ADSL filter 10. Analog telephone adaptor * TAM: Telephone answering machine ** FoIP: Fax over Internet Protocol Test fax setup The fax test does the following: ●● Tests the fax hardware ●● Verifies the correct type of phone cord is connected to the printer ●● Checks that the phone cord is plugged into the correct port ●● Checks for a dial tone ●● Checks for an active phone line ●● Tests the status of your phone line connection To run the fax test: 1. From the Home screen on the printer control panel, press the (Setup) button. 2. Using the buttons to the right, scroll to and select Tools, and then select Run Fax Test. If the test fails, review the report for information on how to fix the problem, make the suggested changes, and run the test again. Use fax Send a standard fax 1. Load your document print-side down on the scanner glass or print-side up in the document feeder. 2. From the Home screen on the printer control panel, press the button next to Fax. 3. Enter the fax number using the keypad or by selecting a speed dial. Tip: To add a pause in the fax number, press * repeatedly, until a dash (-) appears on the display. 4. Press the button next to Start Fax, and then select Black or Color. Tip: If the recipient reports problems with the quality of the fax you sent, try changing the resolution or contrast of your fax. Learn more! For more information about other ways you can send faxes, such as scheduling a fax to be sent later or sending faxes from a computer, see the user guide. (For information, see "User Guide" on page 1.) Send a fax using an extension phone 1. Dial the number by using the keypad on the extension phone. Note: Do not use the keypad on the printer control panel when sending a fax using this method. 2. If the recipient answers the phone, you can engage in a conversation before sending the fax. Note: If a fax machine answers the call, you will hear fax tones from the receiving fax machine. 3. Load your document print-side down on the scanner glass or print-side up in the document feeder. 4. From the Home screen on the printer control panel, press the button next to Fax. 5. When you are ready to send the fax, select Black or Color. 6. If prompted, select Send Fax. If you were on the phone with the recipient, ask the recipient to start receiving the fax when they hear fax tones on the fax machine. When the printer begins faxing, you can hang up the phone or remain on the line. You might not hear fax tones during fax transmission. 4
-
 1
1 -
 2
2 -
 3
3 -
 4
4 -
 5
5 -
 6
6 -
 7
7 -
 8
8 -
 9
9 -
 10
10 -
11
-
12
-
13
-
14
-
15
-
16
 |
 |