HP OmniBook XE2-DI HP OmniBook XE Series - Corporate Evaluators Guide - Page 23
To update the OmniBook BIOS - hard drive
 |
View all HP OmniBook XE2-DI manuals
Add to My Manuals
Save this manual to your list of manuals |
Page 23 highlights
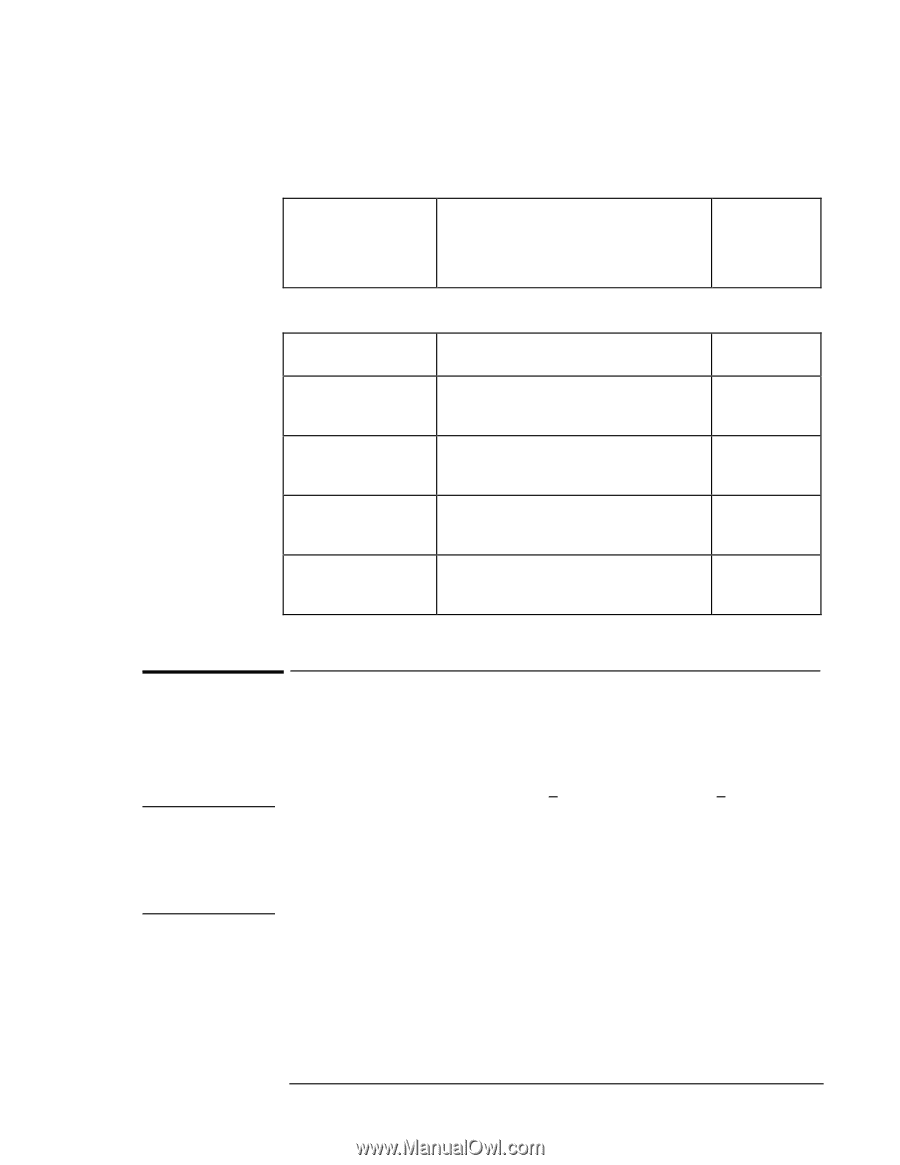
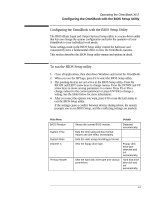
Operating the OmniBook XE2 Configuring the OmniBook with the BIOS Setup Utility Boot Menu Removable Devices Hard Drive ATAPI CD-ROM Drive Shows the order of boot devices. Move the entries to change the order. Removable Devices include the floppy disk drive. Default 1. Removable Devices 2. Hard Drive 3. ATAPI CD-ROM Drive Exit Menu Exit Saving Changes Exit Discarding Changes Load Setup Defaults Discard Changes Save Changes Saves Setup changes to CMOS, exits, and reboots. Discards Setup changes since last save, exits, and reboots. Does not affect security, date, or time changes. Restores default settings, stays in Setup. Does not affect security, date, or time changes. Discards Setup changes since last save, stays in Setup. Does not affect security, date, or time changes. Saves Setup changes to CMOS and stays in Setup. Security settings are saved when changed. Caution To update the OmniBook BIOS Hewlett-Packard may update the BIOS to enhance the capabilities of the OmniBook. Updates will be available from HP Electronic Support Services at either http://www.hp.com/cposupport/eschome.html or http://www.hp.com/cposupport/mobile_computing/software/xe2_100.exe.html. Becaus e a BIOS update replaces the previous version, it is very important you follow these instructions exactly. Otherwise, the OmniBook may be damaged. The BIOS update process resets the configuration settings in the BIOS Setup utility except for the password, date and time. 1. From the Start menu, shut down the OmniBook. 2. Undock and connect the ac adapter to the OmniBook. 3. Remove any PC Cards. 4. Insert the BIOS Update disk in the floppy disk drive. 5. Press the blue power button. 6. When prompted, choose the correct language. 2-7
-
 1
1 -
2
-
3
-
4
-
5
-
6
-
7
-
8
-
9
-
10
-
11
-
12
-
13
-
14
-
15
-
16
-
17
-
 18
18 -
 19
19 -
 20
20 -
 21
21 -
 22
22 -
 23
23 -
 24
24 -
 25
25 -
 26
26 -
 27
27 -
 28
28 -
29
-
30
-
31
-
32
-
33
-
34
-
35
-
36
-
37
-
38
-
39
-
40
-
41
-
42
-
43
-
44
-
45
-
46
-
47
-
48
-
49
-
50
-
51
-
52
-
53
-
54
-
55
-
56
-
57
-
58
-
59
-
60
-
61
-
62
-
63
-
64
-
65
-
66
-
67
-
68
-
69
-
70
-
71
-
72
-
73
-
74
-
75
-
76
-
77
-
78
-
79
-
80
-
81
-
82
-
83
-
84
-
85
-
86
-
87
-
88
-
89
-
90
-
91
-
92
-
93
-
94
-
95
-
96
-
97
-
98
-
99
-
100
-
101
-
102
-
103
-
104
-
105
-
106
 |
 |