HP OmniBook XE2-DI HP OmniBook XE Series - Corporate Evaluators Guide - Page 44
To install a retail version of Windows 98
 |
View all HP OmniBook XE2-DI manuals
Add to My Manuals
Save this manual to your list of manuals |
Page 44 highlights
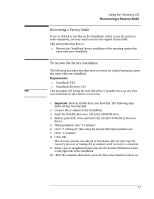
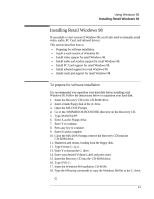
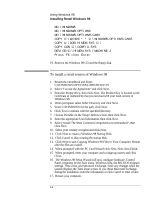
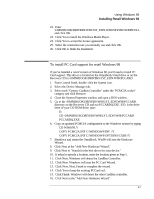
Using Windows 98 Installing Retail Windows 98 MD \WINDOWS MD \WINDOWS\OPTIONS MD \WINDOWS\OPTIONS\CABS COPY X:\WIN98\*.* C:\WINDOWS\OPTIONS\CABS COPY A:\DOS\HIMEM.SYS C:\ COPY CON C:\CONFIG.SYS DEVICE=C:\HIMEM.SYS /MACHINE:2 Press F6 then Enter 19. Remove the Windows 98 CD and the floppy disk. To install a retail version of Windows 98 1. Restart the OmniBook and Enter: C:\WINDOWS\OPTIONS\CABS\SETUP /IS 2. Select "I accept the Agreement" and click Next. 3. Enter the Product Key, then click Next. The Product Key is located on the Certificate of Authenticity that you received with your retail version of Windows 98. 4. When prompted, select Other Directory and click Next. 5. Enter C:\WINDOWS for the path, click Next. 6. Click Yes to continue with the specified directory. 7. Choose Portable on the Setup Options screen, then click Next. 8. Enter the appropriate User Information, then click Next. 9. Select "Install The Most Common Components (recommended)", then click Next. 10. Select your country or region and click Next. 11. Click Next to create a Windows 98 Startup Disk. 12. Click Cancel to skip creating the startup disk. 13. Click Next to start Copying Windows 98 Files to Your Computer. Restart after the files are copied. 14. When prompted with the PC Card Wizard click Next, Next, then Finish. 15. When prompted, enter your computer and workgroup names and click Close. 16. The Windows 98 Setup Wizard will now configure hardware, Control Panel, programs on the Start menu, Windows help, the MS-DOS program settings, Time Zone, and Microsoft Exchange. Enter any changes when the system displays the Time Zone screen. If you chose Microsoft Exchange during the installation, enter the information or click Cancel to enter it later. 17. Restart your computer. 4-4
-
 1
1 -
2
-
3
-
4
-
5
-
6
-
7
-
8
-
9
-
10
-
11
-
12
-
13
-
14
-
15
-
16
-
17
-
18
-
19
-
20
-
21
-
22
-
23
-
24
-
25
-
26
-
27
-
28
-
29
-
30
-
31
-
32
-
33
-
34
-
35
-
36
-
37
-
38
-
 39
39 -
 40
40 -
 41
41 -
 42
42 -
 43
43 -
 44
44 -
 45
45 -
 46
46 -
 47
47 -
 48
48 -
 49
49 -
50
-
51
-
52
-
53
-
54
-
55
-
56
-
57
-
58
-
59
-
60
-
61
-
62
-
63
-
64
-
65
-
66
-
67
-
68
-
69
-
70
-
71
-
72
-
73
-
74
-
75
-
76
-
77
-
78
-
79
-
80
-
81
-
82
-
83
-
84
-
85
-
86
-
87
-
88
-
89
-
90
-
91
-
92
-
93
-
94
-
95
-
96
-
97
-
98
-
99
-
100
-
101
-
102
-
103
-
104
-
105
-
106
 |
 |
