HP PageWide XL 4500 User Guide - Page 163
Replace the scanner’s glass plate (MFP only
 |
View all HP PageWide XL 4500 manuals
Add to My Manuals
Save this manual to your list of manuals |
Page 163 highlights
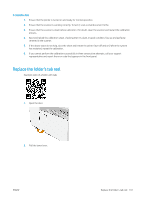
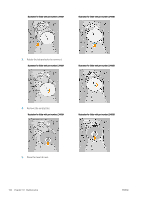
● Remove the glass plate and clean it on both sides. See Replace the scanner's glass plate (MFP only) on page 157. ● Clean the pressure rollers and the feed rollers. 5. Close the scanner cover and gently push it down to lock it into place. 6. Clean the area immediately in front of the scanner, where the scanned sheet rests before scanning. 7. Reconnect the printer's power cable, turn on the power switch at the rear, and turn on the printer using the Power key. Replace the scanner's glass plate (MFP only) Over time, the condition of the glass plate can deteriorate. Small scratches on the surface of the glass can reduce image quality. Contact your support representative (see When you need help on page 171) to order a new glass plate. 1. Turn off the printer using the Power key at the front, then also turn off the power switch at the rear and disconnect the power cable. ENWW Replace the scanner's glass plate (MFP only) 157
-
 1
1 -
2
-
3
-
4
-
5
-
6
-
7
-
8
-
9
-
10
-
11
-
12
-
13
-
14
-
15
-
16
-
17
-
18
-
19
-
20
-
21
-
22
-
23
-
24
-
25
-
26
-
27
-
28
-
29
-
30
-
31
-
32
-
33
-
34
-
35
-
36
-
37
-
38
-
39
-
40
-
41
-
42
-
43
-
44
-
45
-
46
-
47
-
48
-
49
-
50
-
51
-
52
-
53
-
54
-
55
-
56
-
57
-
58
-
59
-
60
-
61
-
62
-
63
-
64
-
65
-
66
-
67
-
68
-
69
-
70
-
71
-
72
-
73
-
74
-
75
-
76
-
77
-
78
-
79
-
80
-
81
-
82
-
83
-
84
-
85
-
86
-
87
-
88
-
89
-
90
-
91
-
92
-
93
-
94
-
95
-
96
-
97
-
98
-
99
-
100
-
101
-
102
-
103
-
104
-
105
-
106
-
107
-
108
-
109
-
110
-
111
-
112
-
113
-
114
-
115
-
116
-
117
-
118
-
119
-
120
-
121
-
122
-
123
-
124
-
125
-
126
-
127
-
128
-
129
-
130
-
131
-
132
-
133
-
134
-
135
-
136
-
137
-
138
-
139
-
140
-
141
-
142
-
143
-
144
-
145
-
146
-
147
-
148
-
149
-
150
-
151
-
152
-
153
-
154
-
155
-
156
-
157
-
 158
158 -
 159
159 -
 160
160 -
 161
161 -
 162
162 -
 163
163 -
 164
164 -
 165
165 -
 166
166 -
 167
167 -
 168
168 -
169
-
170
-
171
-
172
-
173
-
174
-
175
-
176
-
177
-
178
-
179
-
180
-
181
-
182
-
183
-
184
-
185
-
186
-
187
-
188
-
189
-
190
-
191
-
192
-
193
 |
 |
