HP Pavilion 9900 HP Pavilion Desktop PCs - (English, French, Spanish) Upgradin - Page 24
Replacing the Diskette Drive
 |
View all HP Pavilion 9900 manuals
Add to My Manuals
Save this manual to your list of manuals |
Page 24 highlights
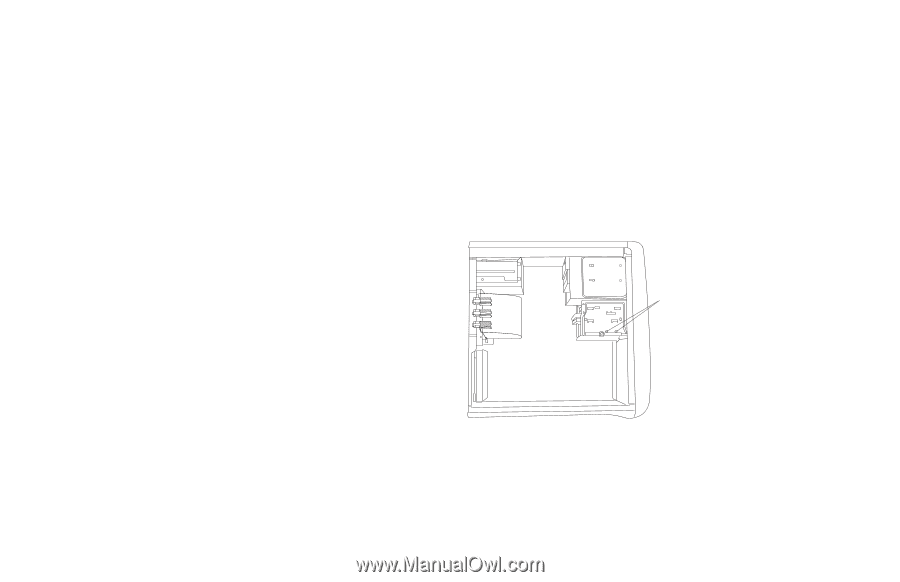
Replacing the Diskette Drive If you need to replace the diskette drive, you can remove the existing drive and install a new one. To ensure that the drive fits properly into the HP Pavilion, be sure to purchase the replacement diskette drive from HP. Refer to the Support Path card for the telephone number of the HP Customer Care Center. To remove the diskette drive: 1 Turn off the computer and all peripherals. 2 Disconnect the modem/phone cable. 3 Disconnect the power cord and all other attached cables (such as the keyboard, mouse, and monitor). 4 Remove the front cover (see "Removing the Front Cover" on page 4). 5 Remove both of the side panels (see "Removing the Side Panels" on page 4). 6 Remove the fan duct (see "Removing the Fan Duct" on page 6). 20 hp pavilion home pc 7 Disconnect the power and IDE cables attached to the back of the diskette drive. Note: If you are having trouble disconnecting the cables, you can remove the fan duct (see "Removing the Fan Duct" on page 6). 8 Remove the two screws (D) on the side of the diskette drive and then remove the two screws on the other side of the diskette drive. D 9 Push the diskette drive out through the front of the computer.
-
 1
1 -
2
-
3
-
4
-
5
-
6
-
7
-
8
-
9
-
10
-
11
-
12
-
13
-
14
-
15
-
16
-
17
-
18
-
 19
19 -
 20
20 -
 21
21 -
 22
22 -
 23
23 -
 24
24 -
 25
25 -
 26
26 -
 27
27 -
 28
28 -
 29
29 -
30
-
31
-
32
-
33
-
34
-
35
-
36
-
37
-
38
-
39
-
40
-
41
-
42
-
43
-
44
-
45
-
46
-
47
-
48
-
49
-
50
-
51
-
52
-
53
-
54
-
55
-
56
-
57
-
58
-
59
-
60
-
61
-
62
-
63
-
64
-
65
-
66
-
67
-
68
-
69
-
70
-
71
-
72
-
73
-
74
-
75
-
76
-
77
-
78
-
79
-
80
-
81
-
82
-
83
-
84
-
85
-
86
-
87
-
88
-
89
-
90
-
91
-
92
-
93
-
94
-
95
-
96
-
97
-
98
-
99
-
100
-
101
-
102
-
103
-
104
-
105
-
106
-
107
-
108
-
109
-
110
-
111
-
112
-
113
-
114
-
115
-
116
-
117
-
118
-
119
-
120
-
121
-
122
-
123
-
124
-
125
-
126
-
127
-
128
-
129
-
130
-
131
-
132
-
133
-
134
-
135
-
136
-
137
-
138
-
139
-
140
-
141
-
142
-
143
-
144
-
145
-
146
-
147
-
148
-
149
-
150
 |
 |