HP Pavilion Sleekbook 15-b000 HP Pavilion Sleekbook 15 Maintenance and Service - Page 63
Memory module, WARNING, CAUTION, IMPORTANT
 |
View all HP Pavilion Sleekbook 15-b000 manuals
Add to My Manuals
Save this manual to your list of manuals |
Page 63 highlights
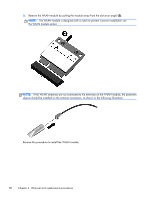
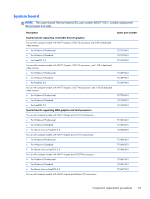
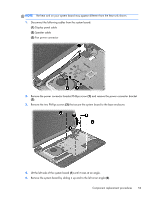
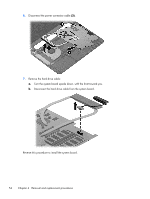
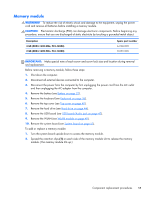
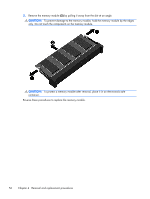
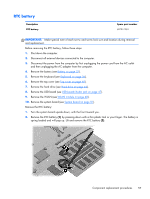
Memory module WARNING! To reduce the risk of electric shock and damage to the equipment, unplug the power cord and remove all batteries before installing a memory module. CAUTION: Electrostatic discharge (ESD) can damage electronic components. Before beginning any procedure, ensure that you are discharged of static electricity by touching a grounded metal object. Description 4 GB (DDR3-1600 MHz, PC3-12800) 2 GB (DDR3-1600 MHz, PC3-12800) Spare part number 641369-005 652972-005 IMPORTANT: Make special note of each screw and screw lock size and location during removal and replacement. Before removing a memory module, follow these steps: 1. Shut down the computer. 2. Disconnect all external devices connected to the computer. 3. Disconnect the power from the computer by first unplugging the power cord from the AC outlet and then unplugging the AC adapter from the computer. 4. Remove the battery (see Battery on page 32). 5. Remove the keyboard (see Keyboard on page 36). 6. Remove the top cover (see Top cover on page 40). 7. Remove the hard drive (see Hard drive on page 44). 8. Remove the USB board (see USB board/Audio jack on page 47). 9. Remove the WLAN (see WLAN module on page 48). 10. Remove the system board (see System board on page 51). To add or replace a memory module: 1. Turn the system board upside down to access the memory module. 2. Spread the retention clips (1) on each side of the memory module slot to release the memory module. (The memory module tilts up.) Component replacement procedures 55
-
 1
1 -
2
-
3
-
4
-
5
-
6
-
7
-
8
-
9
-
10
-
11
-
12
-
13
-
14
-
15
-
16
-
17
-
18
-
19
-
20
-
21
-
22
-
23
-
24
-
25
-
26
-
27
-
28
-
29
-
30
-
31
-
32
-
33
-
34
-
35
-
36
-
37
-
38
-
39
-
40
-
41
-
42
-
43
-
44
-
45
-
46
-
47
-
48
-
49
-
50
-
51
-
52
-
53
-
54
-
55
-
56
-
57
-
 58
58 -
 59
59 -
 60
60 -
 61
61 -
 62
62 -
 63
63 -
 64
64 -
 65
65 -
 66
66 -
 67
67 -
 68
68 -
69
-
70
-
71
-
72
-
73
-
74
-
75
-
76
-
77
-
78
-
79
-
80
-
81
-
82
-
83
-
84
-
85
-
86
-
87
-
88
-
89
-
90
-
91
-
92
-
93
-
94
-
95
-
96
-
97
-
98
-
99
-
100
-
101
 |
 |