HP Pavilion p6200 User Guide
HP Pavilion p6200 - Desktop PC Manual
 |
View all HP Pavilion p6200 manuals
Add to My Manuals
Save this manual to your list of manuals |
HP Pavilion p6200 manual content summary:
- HP Pavilion p6200 | User Guide - Page 1
Getting Started - HP Pavilion p6200 | User Guide - Page 2
testing as of June 2007. The specifications of the 802.11n WLAN (wireless local area network) are draft specifications and not final. If the final specifications differ from the draft specifications, it may affect the ability of this device to communicate with other 802.11n WLAN devices. HP supports - HP Pavilion p6200 | User Guide - Page 3
Support on the Web 25 Finding Guides on the Web 25 Finding Onscreen Guides 26 Using the PC Help & Tools Folder 26 Using HP Advisor Software 26 Using the Computer with Safety and Comfort 27 Troubleshooting and Maintenance 29 Troubleshooting Computer Problems 29 Software Troubleshooting - HP Pavilion p6200 | User Guide - Page 4
iv Getting Started (features vary by model) - HP Pavilion p6200 | User Guide - Page 5
. WARNING: To reduce the risk of serious injury, read the Safety & Comfort Guide. It describes proper workstation setup, posture, and health and work habits for computer users , and soot. These can increase the inside temperature, causing fire, trouble, and electrification. Setting Up Your Computer 1 - HP Pavilion p6200 | User Guide - Page 6
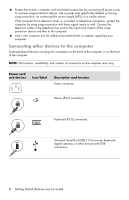
by connecting all power cords to a power surge protection device. Use a power strip specifically labeled as having surge protection, an uninterruptible power supply (UPS), or a similar device. digital cameras, or other devices with USB connectors. 2 Getting Started (features vary by model) - HP Pavilion p6200 | User Guide - Page 7
. Display video output Icon/label Description and function NOTE: For specific information, see the documentation that came with the display device. DVI Recommended for connecting to a monitor. Digital video output connector (select models only), to connect to a TV or monitor. You may need - HP Pavilion p6200 | User Guide - Page 8
its own power source, such as batteries or a separate power cord. For detailed instructions about how to connect and configure other multichannel speakers, go to the Web support page for your model; see "Accessing Support on the Web" on page 25. Audio connectors Icon/label Description and function - HP Pavilion p6200 | User Guide - Page 9
Out connector that matches the back of your computer. Or For 2.1 speakers or other multichannel speakers that were shipped with your computer (select models only), connect the subwoofer to the Audio Line Out connector on the computer, and connect the left and right speakers to the subwoofer. NOTE - HP Pavilion p6200 | User Guide - Page 10
up a wireless network connection (Select models only) You can connect the computer to a wireless network supporting IEEE 802.11b, 802.11g, an existing wireless LAN with an Internet connection. Consult your Internet Service Provider (ISP) for further information. To verify that the integrated WLAN - HP Pavilion p6200 | User Guide - Page 11
on the computer may be green. 2 Plug the other end of the modem/telephone cable into the telephone service line wall jack connector. Connecting the Television Signal and Video Cables (Select models only) This section describes how to connect the computer to a television and which cables to use. Use - HP Pavilion p6200 | User Guide - Page 12
use the primary Audio In connector, which is connected to the motherboard and located on the back of the computer. 8 Getting Started (features vary by model) - HP Pavilion p6200 | User Guide - Page 13
Television output Icon/label Analog Video Description and function Analog Video Out connector to connect S-video or composite video connector to a TV. Television input Icon/label TV/Cable Ant Description and function TV In connector to connect TV antenna or cable input from wall outlet with no - HP Pavilion p6200 | User Guide - Page 14
(B) to route the coaxial TV signal cable from the set-top box (F) to the computer connector (C). Connect the remote control cable/IR blaster (select models only) (G) to the IR OUT connector on the computer, and then position the blaster on the set-top box. This enables the computer to change - HP Pavilion p6200 | User Guide - Page 15
. Connect audio cables to the Audio In right (red) and left (white) connectors (J) on the computer. Connect the remote control cable/IR blaster (select models only) (G) to the IR OUT connector on the computer, and then position the blaster on the set-top box. This enables the computer to change - HP Pavilion p6200 | User Guide - Page 16
remote control at the remote control sensor on the front top of the computer. 3 1 2 IR OUT IR IN 12 Using an external IR receiver (Select models only) If you do not have a direct line of sight to the remote sensor on the front of the computer, you can use an external - HP Pavilion p6200 | User Guide - Page 17
take up to 30 minutes for this one-time language setup on the computer.) Follow the onscreen instructions to register, sign up for updates, and get online. 5 When you see the Windows 7 desktop, the initial setup is complete. For help with getting started using your computer, see the remaining topics - HP Pavilion p6200 | User Guide - Page 18
to the Internet requires that you: 1 Purchase high-speed Internet service from an Internet service provider (ISP). 2 Purchase a broadband modem (DSL or cable). ). Check with your Internet Service Provider (ISP) for specific information on the connection. 14 Getting Started (features vary by - HP Pavilion p6200 | User Guide - Page 19
the initial setup, do so now by using Online Services: a Click the Start button. b Click All Programs. c Click Online Services, and then click Get Online. d Follow the onscreen instructions to select an ISP and set up Internet service. NOTE: Online Services provides a list of ISPs; however, you may - HP Pavilion p6200 | User Guide - Page 20
Volume knob or buttons on the keyboard (select models only). The Volume knob on the speakers (select models only). To set speaker volume, use the Volume the troubleshooting items in "Audio and speakers" on page 36. For more information, open the Help and Support Center or refer to the Support Web - HP Pavilion p6200 | User Guide - Page 21
Windows 7 security feature. A password set in Windows 7 must be entered at a Windows 7 prompt. For information on Windows 7 passwords: Click the Start button, click Help and Support, and then type passwords into the Search Help box and press Enter. See "Using the Help and - HP Pavilion p6200 | User Guide - Page 22
Instructions for using and updating the antivirus software, and for purchasing extended update service, are provided within the program. For more information about computer viruses: Click the Start button, click Help and Support . To solve the problem temporarily, disable the firewall model) - HP Pavilion p6200 | User Guide - Page 23
information, click the Start button, click Help and Support, and then type User Accounts into the Search Help box and press Enter. See "Using If you need help, check the manufacturer documentation or customer service information. For antivirus software, uninstall the existing software program before - HP Pavilion p6200 | User Guide - Page 24
guides you to copy files and settings to a storage device or, using an Easy Transfer Cable, to the new computer. The Easy Transfer Cable is a USB cable designed specifically instructions Support, and then type moving files into the Search Help box and press Enter. See "Using the Help and Support - HP Pavilion p6200 | User Guide - Page 25
only) Your computer may come with a multi-format memory card reader (optional, select models only). Digital cameras and other digital imaging devices use memory cards, or media, to store digital picture files. The memory card reader can read from - HP Pavilion p6200 | User Guide - Page 26
the direction of the notched corner on the media. For more information, open the Help and Support Center or refer to the Support Web site; see "Getting More Information" on page 25. Also: CompactFlash and Microdrive media . Doing so may cause loss of data. 22 Getting Started (features vary by model) - HP Pavilion p6200 | User Guide - Page 27
Burning a label with LightScribe requires three things: A LightScribe-enabled optical disc drive (select models only), identified by the LightScribe logo Labeling software that supports LightScribe A writable LightScribe disc (sold separately) Making a LightScribe label by using CyberLink LabelPrint - HP Pavilion p6200 | User Guide - Page 28
Using the Remote Control (Select models only) NOTE: Only use alkaline batteries in the remote control. With your remote control, you can open Windows Media Bright, direct light aimed toward the sensor might interfere with the remote control operation. 24 Getting Started (features vary by model) - HP Pavilion p6200 | User Guide - Page 29
Web site address listed in the Limited Warranty and Support Guide, or use the following steps: 1 Go to http://www.hp.com/support in your Web browser. 2 Select your country/region and language. 3 Click Support and Drivers. 4 Enter the model number of your computer, and then click Search . Click - HP Pavilion p6200 | User Guide - Page 30
utilities for computer owners, such as support information and programs. To see the items in the PC Help & Tools folder: 1 Click the Start button. 2 Click All Programs. 3 Click PC Help & Tools. Using HP Advisor Software (Select models only) HP Advisor is a desktop tool you use to monitor and access - HP Pavilion p6200 | User Guide - Page 31
to maintain your comfort and productivity. Refer to the Safety & Comfort Guide for important ergonomic information: Click the Start button, click All Programs, click User Guides, and then click Safety & Comfort Guide. Or Type http://www.hp.com/ergo into the Web browser address box, and then press - HP Pavilion p6200 | User Guide - Page 32
28 Getting Started (features vary by model) - HP Pavilion p6200 | User Guide - Page 33
Center or access the Support Web site; see "Getting More Information" on page 25. Refer to the documentation provided by the product manufacturer for information about peripheral-specific problems, such as issues with a monitor or a printer. Troubleshooting Computer Problems The following tables - HP Pavilion p6200 | User Guide - Page 34
setting for your country/region, or refer to the Limited Warranty and Support Guide to contact Support. Test the wall outlet by connecting a different electrical device to it. Use . Refer to the Limited Warranty and Support Guide to contact Support. 30 Getting Started (features vary by model) - HP Pavilion p6200 | User Guide - Page 35
or move the mouse to make the screen display visible again. Press the Sleep button (select models only), or the Esc key on the keyboard, to resume from Sleep mode. Press the On Adjust Screen Resolution. 3 Adjust resolution as necessary, and then click Apply. Troubleshooting and Maintenance 31 - HP Pavilion p6200 | User Guide - Page 36
complete, unplug and reconnect the mouse connector to the back of your computer, and then turn on your computer. 32 Getting Started (features vary by model) - HP Pavilion p6200 | User Guide - Page 37
detailed cleaning instructions, go to: http://www.hp.com/support Select your country/region and language, search on your computer model number, and does not work or is not detected. Check for these problems: Ensure you are using the wireless keyboard or wireless Troubleshooting and Maintenance 33 - HP Pavilion p6200 | User Guide - Page 38
receiver, and away from interference from other devices. 1 Unplug the receiver from a USB connector on the computer, and then reconnect it. Your computer model may have a connector dedicated to the receiver. If you have a choice, use a USB connector on the front of the computer. 2 The receiver may - HP Pavilion p6200 | User Guide - Page 39
the steps that follow to repeat the procedure for the keyboard. 5 Skip this step if your receiver model has no Connect button (A). Push the Connect button on the receiver (A), and hold it for 5 to until the LED (A) on the receiver lights or stops flashing. D Troubleshooting and Maintenance 35 - HP Pavilion p6200 | User Guide - Page 40
. Ensure the speakers are connected to an audio connector, not a Line In or headphone connector. To resume from Sleep mode, press the Sleep button (select models only), or press the Esc key on the keyboard. Unplug headphones if they are connected to your computer (or speaker system). Ensure that you - HP Pavilion p6200 | User Guide - Page 41
service line; doing so may damage the network adapter. For more information about connecting to the Internet, open the Help and Support Center; see "Using the Help and Support 4 Follow the onscreen instructions. Use Device Manager to , and then follow the onscreen instructions. If your system has an - HP Pavilion p6200 | User Guide - Page 42
the Eject button nearest the drive to open the tray. If you suspect a problem with the Eject button itself: 1 Click the Start button, and then click Computer tray, you must first place the computer on its right side (select models only) before you insert the minidisc: 1 Face the front of the - HP Pavilion p6200 | User Guide - Page 43
the content. Click the Start button, and then click Computer. Right-click the hard disk drive, and then click Properties to view the available space. Troubleshooting and Maintenance 39 - HP Pavilion p6200 | User Guide - Page 44
video file in a video editor, and then resave the file in a supported format. Codec error messages appear when I try to play certain video (select models only), and then click Update Driver Software. 5 Select Search automatically for updated driver software. 6 Follow the instructions to update - HP Pavilion p6200 | User Guide - Page 45
vendor directly for an update. For Hewlett-Packard peripheral devices, visit the HP Web site at http://www.hp.com/support Ensure that all cables are properly and securely connected and that the pins click Switch User. Choose a user with administrative privileges. Troubleshooting and Maintenance 41 - HP Pavilion p6200 | User Guide - Page 46
Manager window. 3 Click the plus sign (+) next to the problem device and check for an exclamation point in a yellow circle near the If it is available, click the Troubleshoot button, and follow the onscreen instructions in the device troubleshooter wizard. 7 Restart the computer. Click model) - HP Pavilion p6200 | User Guide - Page 47
For the correct distance, refer to the device instructions. Remove and then reinstall the device: 1 and then click Next. 5 Follow the onscreen wizard instructions. The device may have too many connections. Either discoverability, refer to the device instructions. Ensure other devices that use radio - HP Pavilion p6200 | User Guide - Page 48
to the card. Ensure the amount of stored data does not exceed the storage limit of the memory card. 44 Getting Started (features vary by model) - HP Pavilion p6200 | User Guide - Page 49
Some models may support software problems: Updating Recovery Manager program. System recovery (see "System Recovery" on page 50) - Erases and reformats the hard disk drive, deleting all data files you have created, and then reinstalls the operating system, programs, and drivers. Troubleshooting - HP Pavilion p6200 | User Guide - Page 50
the specific item (for example, HP DVD Writer 640b). 5 Click the Driver tab. 6 To update a driver, click Update Driver, and then follow the onscreen instructions. Or the new software. You can also set restore points manually. If you experience a problem that you think may be due to software on your - HP Pavilion p6200 | User Guide - Page 51
Help and Support. 2 Type system restore in the Search Help box, and then press Enter. Software program and hardware driver reinstallation If an individual factory-installed software program or hardware driver is damaged, you can reinstall it by using the Recovery Manager program (select models only - HP Pavilion p6200 | User Guide - Page 52
trouble-free operation of your computer, and to ease the recovery of important information on your computer if problems on the usage of the computer. Use System Recovery to wipe your Windows operating system installation clean, with a recovery, see "System Recovery" on page 50 for further - HP Pavilion p6200 | User Guide - Page 53
Depending on your disc recording software, you may need to manually enable this feature (refer to the software documentation). If recovery discs This is a one-time procedure that you should perform while your computer is working properly. If you encounter problems Troubleshooting and Maintenance 49 - HP Pavilion p6200 | User Guide - Page 54
. System Recovery System recovery completely erases and reformats recovery: Recovery Image - Run the system recovery from a recovery image stored on your hard disk drive. The recovery recovery from a recovery image, see "System recovery from the Windows 7 Start Menu" on page 52. NOTE: The recovery - HP Pavilion p6200 | User Guide - Page 55
on the keyboard during system startup. 3 Through recovery discs that you create. 4 Through recovery discs purchased from HP Support. To purchase recovery discs, go to http://www.hp.com/support and visit the Software & Driver downloads page for your computer model. Troubleshooting and Maintenance 51 - HP Pavilion p6200 | User Guide - Page 56
and then click Next. System recovery begins. After system recovery is complete, click Finish to restart the computer. 9 Complete the registration process, and wait until you see the desktop. 10 Turn off the computer, the On button to turn on the computer. 52 Getting Started (features vary by model) - HP Pavilion p6200 | User Guide - Page 57
click Next. System recovery begins. After system recovery is complete, click Finish to restart the computer. 7 Complete the registration process, and wait until you see the desktop. 8 Turn off Next. 8 If you are prompted to insert the next recovery disc, do so. Troubleshooting and Maintenance 53 - HP Pavilion p6200 | User Guide - Page 58
setup instructions. 2 Follow the instructions in "Preparing to Use Your Computer" on page 13. Additional Troubleshooting For additional troubleshooting solutions, refer to the following: HP Support Assistant HP Support Assistant helps you maintain your PC performance and resolve problems faster - HP Pavilion p6200 | User Guide - Page 59
36 B backup 49 buttons eject CD/DVD drive 23 Off, See turning off computer 14 C card reader, memory 21 CD/DVD drive troubleshooting 38-40 using vertical 23 cleaning 49 Composite video connector 8 computer cleaning 49 Help & Tools 26 setting up 1 transferring files 20 turning on the computer - HP Pavilion p6200 | User Guide - Page 60
31 power connector 2 R recording level, adjusting 16 Recovery Manager 47 reinstall a software program 47 remote control 24 troubleshooting 44 repairing software 45 repetitive strain injury (RSI), see Safety & Comfort Guide restarting the computer 14 restoring your computer configuration 46 - HP Pavilion p6200 | User Guide - Page 61
troubleshooting 30 Support Web site 25 surge protector 2 S-video In connector 8 System 46 System performance troubleshooting 42 System recovery 50 System Restore, Microsoft 46 system recovery discs, making 49, 50 T television see TV transferring information to your new computer 20 troubleshooting - HP Pavilion p6200 | User Guide - Page 62
- HP Pavilion p6200 | User Guide - Page 63
- HP Pavilion p6200 | User Guide - Page 64
help you dispose of your old computer with minimum impact on the planet. Did you know that screen savers can prevent your HP PC from going to sleep and thereby waste power? Screen savers can also actually reduce the life of your monitor by increasing the number of hours
-
 1
1 -
 2
2 -
 3
3 -
 4
4 -
 5
5 -
 6
6 -
 7
7 -
8
-
9
-
10
-
11
-
12
-
13
-
14
-
15
-
16
-
17
-
18
-
19
-
20
-
21
-
22
-
23
-
24
-
25
-
26
-
27
-
28
-
29
-
30
-
31
-
32
-
33
-
34
-
35
-
36
-
37
-
38
-
39
-
40
-
41
-
42
-
43
-
44
-
45
-
46
-
47
-
48
-
49
-
50
-
51
-
52
-
53
-
54
-
55
-
56
-
57
-
58
-
59
-
60
-
61
-
62
-
63
-
64
 |
 |

Getting Started