HP Pavilion ze4400 Maintenance and Service Guide - Page 86
CPU module, Wireless LAN Mini PCI card if present, SDRAM modules, Reprogramming the BIOS IC - bios update
 |
View all HP Pavilion ze4400 manuals
Add to My Manuals
Save this manual to your list of manuals |
Page 86 highlights
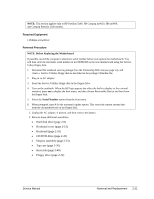
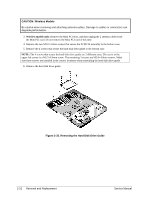
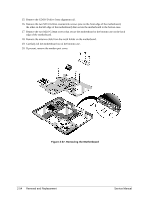
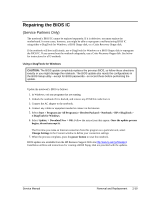
Reassembly Procedure CAUTION: Be extremely careful when replacing the motherboard. The motherboard has EMI springs attached to it that can bend very easily. Bending any EMI spring could cause a motherboard short. NOTE: Reprogramming the BIOS IC A new BIOS IC contains only enough basic programming to enable the notebook to boot. After installing a new motherboard, you must reprogram the BIOS IC, preferably with the latest BIOS-(see page 2-60.) 1. Remove the following components from the old motherboard, and then install onto the new motherboard: • CPU module • Wireless LAN Mini PCI card (if present) • SDRAM modules 2. Follow the reassembly notes in the section entitled "Removing the Motherboard" on page 2-50. NOTE: After Replacing the Motherboard If present, insert the modem port cover into the modem port opening. Afterwards, you must use the Service Utility floppy disk to store the system data and display information in the EEPROM on the new motherboard. To do so: 1. Plug in an AC adapter. 2. Insert the Service Utilities floppy disk in the floppy drive. 3. Turn on the notebook. 4. If you hear 5 beeps, press F1 to update the display data stored on the motherboard. Let the notebook reboot, and then go to the next step. 5. Select the Serial Number option from the boot menu. 6. If you successfully stored system data on the floppy disk before removing the old motherboard, type A for the automatic update. This restores the old system data on the new motherboard. If you did not store system data, type M for the manual update option. Enter the serial number from the bottom of the notebook-you might have to contact an HP support center to do this. 2-56 Removal and Replacement Service Manual
-
 1
1 -
2
-
3
-
4
-
5
-
6
-
7
-
8
-
9
-
10
-
11
-
12
-
13
-
14
-
15
-
16
-
17
-
18
-
19
-
20
-
21
-
22
-
23
-
24
-
25
-
26
-
27
-
28
-
29
-
30
-
31
-
32
-
33
-
34
-
35
-
36
-
37
-
38
-
39
-
40
-
41
-
42
-
43
-
44
-
45
-
46
-
47
-
48
-
49
-
50
-
51
-
52
-
53
-
54
-
55
-
56
-
57
-
58
-
59
-
60
-
61
-
62
-
63
-
64
-
65
-
66
-
67
-
68
-
69
-
70
-
71
-
72
-
73
-
74
-
75
-
76
-
77
-
78
-
79
-
80
-
 81
81 -
 82
82 -
 83
83 -
 84
84 -
 85
85 -
 86
86 -
 87
87 -
 88
88 -
 89
89 -
 90
90 -
 91
91 -
92
-
93
-
94
-
95
-
96
-
97
-
98
-
99
-
100
-
101
-
102
-
103
-
104
-
105
-
106
-
107
-
108
-
109
-
110
-
111
-
112
-
113
-
114
-
115
-
116
-
117
-
118
-
119
-
120
-
121
-
122
-
123
-
124
-
125
-
126
-
127
-
128
-
129
-
130
-
131
-
132
-
133
-
134
-
135
-
136
-
137
-
138
-
139
-
140
-
141
-
142
-
143
-
144
-
145
-
146
-
147
-
148
-
149
-
150
-
151
-
152
-
153
-
154
 |
 |