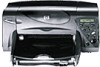
HP Photosmart 1215 HP Photosmart 1215/1218 Color Printer - (English) User Guid - Page 117
Connecting the printer, Networking the printer, Connect the printer with a, parallel cable, USB cable
 |
View all HP Photosmart 1215 manuals
Add to My Manuals
Save this manual to your list of manuals |
Page 117 highlights
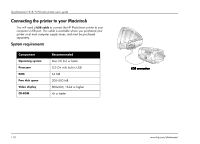
Connecting the printer Connecting the printer to your Windows PC To... Connect the printer with a parallel cable Connect the printer with a USB cable Follow these steps... 1. Shut down Windows and turn the computer off. 2. Connect the printer to the computer, using the parallel cable you purchased. 3. Plug in the printer, using the power cord that came in the package. 4. On the printer front panel, press Power to turn on the printer. 5. Turn on the computer. 6. Install the print cartridges and load paper. 7. Install the printer software. If you are using Windows 98, Windows 2000, or Windows Me and your computer has a USB port, you can connect the printer to the computer using USB. Note: The computer can be ON when you connect the printer with a USB cable. 1. Connect the printer to the computer, using the USB cable you purchased. 2. Plug in the printer, using the power cord that came in the package. 3. On the printer front panel, press Power to turn the printer on. 4. Install the print cartridges and load paper. 5. Install the printer software. Networking the printer If you are connecting the printer to a network, see the Networking Guide for Windows PCs on the Web at www.hp.com/photosmart. www.hp.com/photosmart 111
-
 1
1 -
2
-
3
-
4
-
5
-
6
-
7
-
8
-
9
-
10
-
11
-
12
-
13
-
14
-
15
-
16
-
17
-
18
-
19
-
20
-
21
-
22
-
23
-
24
-
25
-
26
-
27
-
28
-
29
-
30
-
31
-
32
-
33
-
34
-
35
-
36
-
37
-
38
-
39
-
40
-
41
-
42
-
43
-
44
-
45
-
46
-
47
-
48
-
49
-
50
-
51
-
52
-
53
-
54
-
55
-
56
-
57
-
58
-
59
-
60
-
61
-
62
-
63
-
64
-
65
-
66
-
67
-
68
-
69
-
70
-
71
-
72
-
73
-
74
-
75
-
76
-
77
-
78
-
79
-
80
-
81
-
82
-
83
-
84
-
85
-
86
-
87
-
88
-
89
-
90
-
91
-
92
-
93
-
94
-
95
-
96
-
97
-
98
-
99
-
100
-
101
-
102
-
103
-
104
-
105
-
106
-
107
-
108
-
109
-
110
-
111
-
 112
112 -
 113
113 -
 114
114 -
 115
115 -
 116
116 -
 117
117 -
 118
118 -
 119
119 -
 120
120 -
 121
121 -
 122
122 -
123
-
124
-
125
-
126
-
127
 |
 |
