HP Photosmart 3100 Setup Guide - Page 3
Press the On button and configure, Connect the power cord, Connect the supplied phone cord - ink
 |
View all HP Photosmart 3100 manuals
Add to My Manuals
Save this manual to your list of manuals |
Page 3 highlights
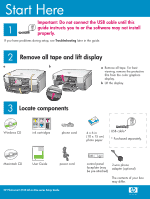
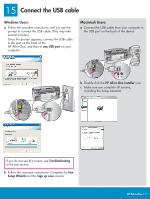
6 Connect the power cord Important: Do not connect the USB cable until instructed later in this guide. 7 Connect the supplied phone cord Connect one end of the supplied phone cord to the phone port on the left (1-LINE) and the other to a wall jack. To connect an answering machine or use your own phone cord with the 2-wire adapter, see the User Guide. 8 Press the On button and configure On a After you press the On button, the blue light flashes, and then becomes solid. This may take up to a minute. b Wait for the ink cartridge prompt before continuing. HP All-in-One • 3
-
 1
1 -
 2
2 -
 3
3 -
 4
4 -
 5
5 -
 6
6 -
 7
7 -
 8
8
 |
 |

HP All-in-One • 3
6
8
7
Important
: Do not connect the USB cable
until instructed later in this guide.
a
After you press the
On
button, the blue light flashes, and
then becomes solid. This may take up to a minute.
b
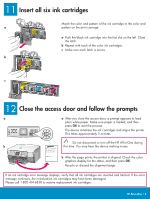
Wait for the ink cartridge prompt before continuing.
On
Press the On button and configure
Connect the power cord
Connect the supplied phone cord
Connect one end of the supplied phone cord to the phone
port on the left
(1-LINE)
and the other to a wall jack.
To connect an answering machine or use your own phone
cord with the 2-wire adapter, see the User Guide.