HP Photosmart 8200 User's Guide - Page 8
Accessing the onscreen HP Photosmart Printer Help, Printer parts, HP Image Zone Help - install
 |
View all HP Photosmart 8200 manuals
Add to My Manuals
Save this manual to your list of manuals |
Page 8 highlights
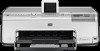
Chapter 1 Accessing the onscreen HP Photosmart Printer Help After you have installed the HP Photosmart printer software on a computer, you can view the onscreen HP Photosmart Printer Help: ● Windows PC: From the Start menu, select Programs (in Windows XP, select All Programs) > HP > Photosmart 8200 series > Photosmart Help. ● Macintosh: Select Help > Mac Help in the Finder, then select Help Center > HP Image Zone Help > HP Photosmart Printer Help. Printer parts Front of printer 1 On: Press this button to turn on the printer. 2 Top cover: Lift this cover to access the ink cartridges and to clear paper jams. To lift the cover, grasp the top cover below the HP logo and pull upward. 3 Printer Screen: Use this screen to view photos, menus, and messages. 4 Output tray: Use this tray to catch your printouts. Remove this tray to access the Photo tray. 5 Main tray: Pull out this tray and load plain paper, transparencies, envelopes, or other media with the side to be printed facing down. 6 Photo tray: Remove the Output tray and load small-size paper up to 10 x 15 cm (4 x 6 inch) into the Photo tray for printing with the side to be printed facing down. The paper may be tabbed or untabbed. 7 Memory card slots: Insert memory cards here. For a list of supported memory cards, see Inserting a memory card. 8 Camera port: Connect a PictBridge™ digital camera, the optional HP Bluetooth® wireless printer adapter, or an HP iPod. Back of printer 1 Power cord connection: Use this port to connect the power cord included with the printer. 2 USB port: Use this port to connect the printer to a computer. 3 Rear access door: Remove this door to clear paper jams or to install the optional HP Automatic Two-sided Printing Accessory. See Available accessories. 4 HP Photosmart 8200 series
-
 1
1 -
2
-
 3
3 -
 4
4 -
 5
5 -
 6
6 -
 7
7 -
 8
8 -
 9
9 -
 10
10 -
 11
11 -
 12
12 -
 13
13 -
14
-
15
-
16
-
17
-
18
-
19
-
20
-
21
-
22
-
23
-
24
-
25
-
26
-
27
-
28
-
29
-
30
-
31
-
32
-
33
-
34
-
35
-
36
-
37
-
38
-
39
-
40
-
41
-
42
-
43
-
44
-
45
-
46
-
47
-
48
-
49
-
50
-
51
-
52
-
53
-
54
-
55
-
56
-
57
-
58
-
59
-
60
-
61
-
62
-
63
-
64
-
65
-
66
-
67
-
68
-
69
-
70
-
71
-
72
-
73
-
74
-
75
-
76
-
77
-
78
-
79
-
80
-
81
 |
 |
