HP Photosmart A630 Basics Guide - Page 15
Remove red-eye from your photos, Print from a computer, Software installation, To remove red-eye - printer driver
 |
View all HP Photosmart A630 manuals
Add to My Manuals
Save this manual to your list of manuals |
Page 15 highlights
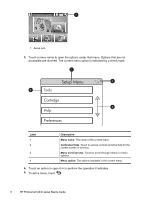
English Photo Fix remains off until you turn it on again. Photo Fix is always on for Bluetooth or PictBridge printing. Remove red-eye from your photos The printer provides a way to reduce red-eye that can occur in photos taken with a flash. To remove red-eye 1. Touch the Setup icon to view the Setup menu. 2. Touch Preferences. 3. Touch Red Eye Removal. 4. Touch On to remove red eye from all photos. Touch Off to undo red eye removal from all photos. Print from a computer Printing from a computer gives you more options for printing your images. Before printing from your computer, you must install the HP Photosmart software and connect the USB cable from the printer (using the USB port on the back) to your computer. NOTE: The USB 2.0 cable required for printing from a computer might not be included in the box with the printer, so you might need to purchase it separately. Software installation The printer includes HP quick connect software, which installs when you connect the printer to your computer. In less than two minutes, you'll be ready to print from your computer! NOTE: Windows XP or Vista or Mac OS X v10.4 or v10.5. For Windows 64-bit systems: Please download the software from the HP support website at www.hp.com/support. To install the software 1. Make sure the printer is on, and then connect the printer to your computer with a USB cable. 2. Follow the steps for your operating system. Windows users ▲ The installation starts automatically. If the installation screen does not appear, open My Computer on your desktop and double-click the HP_A630_Series icon to launch the installation. Mac users a. Double-click the HP A630 CD icon on the desktop. b. Double-click the installer icon in the CD folder. 3. Follow the prompts on your computer. When connected to a computer, the printer is controlled by the printer software you installed on the computer. Use this software, also known as the printer driver, to change the print settings and to begin print jobs. Print from a computer 11
-
 1
1 -
2
-
3
-
4
-
5
-
6
-
7
-
8
-
9
-
 10
10 -
 11
11 -
 12
12 -
 13
13 -
 14
14 -
 15
15 -
 16
16 -
 17
17 -
 18
18 -
 19
19 -
 20
20 -
21
-
22
-
23
-
24
-
25
-
26
-
27
-
28
-
29
-
30
-
31
-
32
-
33
-
34
-
35
-
36
-
37
-
38
-
39
-
40
-
41
-
42
-
43
-
44
-
45
-
46
-
47
-
48
-
49
-
50
-
51
-
52
-
53
-
54
-
55
-
56
-
57
-
58
-
59
-
60
-
61
-
62
-
63
-
64
-
65
-
66
-
67
-
68
-
69
-
70
-
71
-
72
-
73
-
74
-
75
-
76
-
77
-
78
-
79
-
80
-
81
 |
 |
