HP Photosmart All-in-One Printer - B109 User Guide - Page 62
Check product, Align the Printer
 |
View all HP Photosmart All-in-One Printer - B109 manuals
Add to My Manuals
Save this manual to your list of manuals |
Page 62 highlights
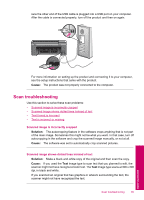
Chapter 11 Step 2: Load the stack of paper correctly Solution: Remove the stack of paper from the paper tray, reload the paper, and then slide the paper-width guide inward until it stops at the edge of the paper. NOTE: Do not leave unused photo paper in the paper tray. The paper might start to curl, which could reduce the quality of your printout. For best results, do not allow printed photos to stack up in the paper tray. For more information, see: "Load media" on page 12 Cause: The paper was loaded incorrectly. Check product Follow these steps. • Step 1: Align the printer • Step 2: Clean the printhead Step 1: Align the printer Solution: Aligning the printer can help ensure excellent print quality. To align the printer from the HP Photosmart Software 1. Load letter, A4, or legal unused plain white paper into the paper tray. 2. In the HP Solution Center, click Settings. 3. In the Print Settings area, click Printer Toolbox. NOTE: You can also open the Printer Toolbox from the Print Properties dialog box. In the Print Properties dialog box, click the Features tab, and then click Printer Services. The Printer Toolbox appears. 4. Click the Device Services tab. 5. Click Align the Printer. 6. When prompted, ensure plain white letter or A4 paper is loaded in the paper tray, then press OK. NOTE: If you have colored paper loaded in the paper tray when you align the print cartridges, the alignment will fail. Load unused plain white paper into the paper tray, and then try the alignment again. The product prints an alignment sheet. 7. Load the page print side down on the right front corner of the glass, and then press OK to scan the page. When the On button stops flashing, the alignment is complete and the page can be removed. Recycle or discard the page. Cause: The printer needed to be aligned. Solve a problem 60 Solve a problem
-
 1
1 -
2
-
3
-
4
-
5
-
6
-
7
-
8
-
9
-
10
-
11
-
12
-
13
-
14
-
15
-
16
-
17
-
18
-
19
-
20
-
21
-
22
-
23
-
24
-
25
-
26
-
27
-
28
-
29
-
30
-
31
-
32
-
33
-
34
-
35
-
36
-
37
-
38
-
39
-
40
-
41
-
42
-
43
-
44
-
45
-
46
-
47
-
48
-
49
-
50
-
51
-
52
-
53
-
54
-
55
-
56
-
 57
57 -
 58
58 -
 59
59 -
 60
60 -
 61
61 -
 62
62 -
 63
63 -
 64
64 -
 65
65 -
 66
66 -
 67
67 -
68
-
69
-
70
-
71
-
72
-
73
-
74
-
75
-
76
-
77
-
78
-
79
-
80
-
81
-
82
-
83
-
84
-
85
-
86
-
87
-
88
-
89
-
90
-
91
-
92
-
93
-
94
-
95
-
96
-
97
-
98
-
99
-
100
-
101
-
102
-
103
-
104
-
105
-
106
-
107
-
108
-
109
-
110
-
111
-
112
 |
 |