HP Photosmart C4400 Basics Guide - Page 11
Make a copy, Replace the print cartridges, To scan to a computer, Scan/Reprint, Scan to PC, Accept - check ink levels
 |
View all HP Photosmart C4400 manuals
Add to My Manuals
Save this manual to your list of manuals |
Page 11 highlights
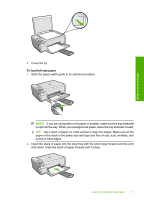
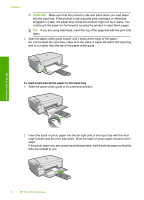
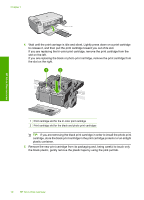
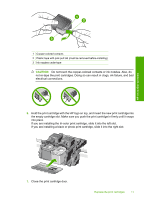
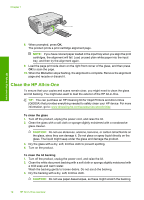
HP All-in-One overview Make a copy You can make quality copies from the control panel. To scan to a computer 1. Load your original print side down on the right front corner of the glass. NOTE: Ensure that there are no memory cards inserted in the memory card slots on the product. 2. Press the button next to Scan/Reprint. The Scan/Reprint menu appears. 3. Press the button next to Scan to PC. A preview image of the scan appears on your computer, where you can edit it. Any edits that you make apply to the current scan session only. The HP Photosmart Software has many tools that you can use to edit your scanned image. You can improve the overall image quality by adjusting the brightness, sharpness, color tone, and saturation. You can also crop, straighten, rotate, or resize the image. 4. Make any edits to the preview image, and then click Accept when you are finished. Replace the print cartridges Follow these instructions to replace print cartridges. Following these instructions might also help solve print quality issues related to the cartridges. NOTE: When the ink level for the print cartridge is low, a message appears on your computer screen. You can also check the ink levels by using the software installed with the HP All-in-One. When you receive a low-ink warning message, make sure you have a replacement print cartridge available. You should also replace the print cartridges when you see faded text or if you experience print quality issues related to the print cartridges. To order print cartridges for the HP All-in-One, go to www.hp.com/buy/supplies. If prompted, choose your country/region, follow the prompts to select your product, and then click one of the shopping links on the page. To replace the print cartridges 1. Make sure the product is turned on. CAUTION: If the product is turned off when you open the print cartridge door to access the print cartridges, it will not release the cartridges for changing. You might damage the product if the print cartridges are not docked safely when you try to remove them. 2. Make sure you have letter or A4 unused plain white paper loaded in the input tray. 3. Open the print cartridge door. The print carriage moves to the far right side of the product. Replace the print cartridges 9
-
 1
1 -
2
-
3
-
4
-
5
-
 6
6 -
 7
7 -
 8
8 -
 9
9 -
 10
10 -
 11
11 -
 12
12 -
 13
13 -
 14
14 -
 15
15 -
 16
16 -
17
-
18
-
19
-
20
-
21
-
22
-
23
 |
 |
