HP Photosmart D7400 Setup Guide - Page 5
del papel.
 |
View all HP Photosmart D7400 manuals
Add to My Manuals
Save this manual to your list of manuals |
Page 5 highlights
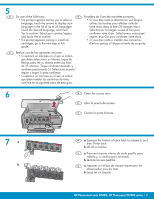
9a b c d 10 a EN a. Pull out the main tray. b. Slide the paper-width guide to the left. c. Insert plain white paper into the main tray. d. Push in the main tray and touch OK. ES a. Tire de la bandeja principal. b. Deslice la guía de anchura del papel hacia la izquierda. c. Inserte papel blanco normal en la bandeja principal. d. Empuje la bandeja principal y toque OK. FR a. Tirez le bac principal. b. Faites glisser le guide de largeur du papier vers la gauche. c. Insérez du papier blanc ordinaire dans le bac principal. d. Insérez le bac principal et sélectionnez OK. b d EN If you have photo paper, load it now. If you do FR Si vous avez du papier photo, chargez-le maintenant. not have photo paper, continue to step 11. Si vous n'avez pas de papier photo, passez à a. Lift the photo tray lid. l'étape 11. b. Load photo paper with the glossy side down in a. Soulevez le capot du bac photo. the photo tray. Slide the paper guides against b. Chargez le papier photo côté brillant vers le bas the photo paper. dans le bac photo. Placez les guides du papier c. Push the photo tray in, and lower the photo contre le papier photo. tray lid. c. Insérez le bac photo et abaissez le capot de d. Pull out the tray extender and lift up the paper celui-ci. catch. d. Tirez l'extension du bac et soulevez le bac de récupération de papier. ES En caso de disponer de papel fotográfico, cárguelo en este momento. Si no dispone de este tipo de papel, continúe en el paso 11. a. Levante la tapa de la bandeja de fotografías. b. Coloque el papel fotográfico con la cara brillante orientada hacia abajo en la bandeja de fotografías. Deslice las guías de papel hacia el papel fotográfico. c. Inserte la bandeja de fotografías y baje la tapa. d. Tire del extensor de la bandeja y levante el tope del papel. HP Photosmart série D7400/ HP Photosmart D7400 series • 5
-
 1
1 -
 2
2 -
 3
3 -
 4
4 -
 5
5 -
 6
6 -
 7
7 -
 8
8 -
 9
9 -
 10
10 -
 11
11 -
12
-
13
-
14
-
15
-
16
-
17
-
18
-
19
-
20
-
21
-
22
-
23
-
24
 |
 |
