HP Photosmart R840 User Guide - Page 8
Install the battery, Charge the battery, Turn on the camera, Close the Battery/Memory Card door. - usb cable
 |
View all HP Photosmart R840 manuals
Add to My Manuals
Save this manual to your list of manuals |
Page 8 highlights
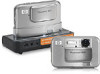
Chapter 1 Install the battery 1. Open the Battery/Memory Card door by sliding the door latch as indicated on the Battery/ Memory Card door. 2. Insert the battery in the larger slot, pushing the battery in until the latch catches. 3. Close the Battery/Memory Card door. To remove the battery, move the battery latch as shown until the battery springs free. NOTE: Fully charge the battery before using it the first time (see "Charge the battery" on page 6). Turn off the camera before removing the battery. Charge the battery To charge the battery in the camera: 1. Plug the small end of the USB cable into the camera and the large end into the power adapter, then plug the power adapter into an electrical outlet, as shown. It may take up to one minute for the camera's Battery Charging light to start blinking, indicating that the battery is charging. The battery is fully charged when the Battery Charging light turns on solid (see "Recharging the Lithium Ion battery" on page 49 for information on charging times). 2. When charging is complete, disconnect the camera from the power adapter. NOTE: For other methods for recharging the battery, see "Recharging the Lithium Ion battery" on page 49. Turn on the camera To turn on the camera, slide the lens cover open until it clicks, uncovering the lens. To turn off the camera, slide the lens cover closed until it clicks, covering the lens. CAUTION: When sliding the lens cover, keep your fingers clear of the lens. Fingerprints on the lens can impair the quality of the picture. 6 Getting started
-
 1
1 -
2
-
 3
3 -
 4
4 -
 5
5 -
 6
6 -
 7
7 -
 8
8 -
 9
9 -
 10
10 -
 11
11 -
 12
12 -
 13
13 -
14
-
15
-
16
-
17
-
18
-
19
-
20
-
21
-
22
-
23
-
24
-
25
-
26
-
27
-
28
-
29
-
30
-
31
-
32
-
33
-
34
-
35
-
36
-
37
-
38
-
39
-
40
-
41
-
42
-
43
-
44
-
45
-
46
-
47
-
48
-
49
-
50
-
51
-
52
-
53
-
54
-
55
-
56
-
57
-
58
-
59
 |
 |
