HP Photosmart c500 HP PhotoSmart C500 Digital Camera - Complete User’ - Page 107
Connecting the Camera to Your PC, HP PhotoSmart C500 Digital Camera User's Guide
 |
View all HP Photosmart c500 manuals
Add to My Manuals
Save this manual to your list of manuals |
Page 107 highlights
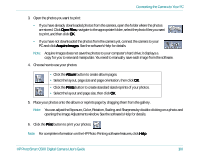
Connecting the Camera to Your PC 3. Start the HP Photo Imaging software: • Double-click the C500 Photo Imaging Software icon on your desktop. OR • Click Start, Programs, HP PhotoSmart, C500 Camera, C500 Photo Imaging Software. 4. Click Unload Camera. 5. The photos will be saved in the folder listed in the Save my images to section. If you want to change the location of this folder, click the browse (...) button and choose a new folder. 6. If you want to create a sub-folder based on the date and time, select In new sub-folder. A new folder will be created within the folder shown in the Save my images to section. Note: Once you are familiar with the download process, you can delete photos from the camera after they are saved on your computer. Select Delete all images from camera after download. 7. Click Start. 8. Click Yes to confirm that the images are being saved in the correct folder and to download the photos. HP PhotoSmart C500 Digital Camera User's Guide 97
-
 1
1 -
2
-
3
-
4
-
5
-
6
-
7
-
8
-
9
-
10
-
11
-
12
-
13
-
14
-
15
-
16
-
17
-
18
-
19
-
20
-
21
-
22
-
23
-
24
-
25
-
26
-
27
-
28
-
29
-
30
-
31
-
32
-
33
-
34
-
35
-
36
-
37
-
38
-
39
-
40
-
41
-
42
-
43
-
44
-
45
-
46
-
47
-
48
-
49
-
50
-
51
-
52
-
53
-
54
-
55
-
56
-
57
-
58
-
59
-
60
-
61
-
62
-
63
-
64
-
65
-
66
-
67
-
68
-
69
-
70
-
71
-
72
-
73
-
74
-
75
-
76
-
77
-
78
-
79
-
80
-
81
-
82
-
83
-
84
-
85
-
86
-
87
-
88
-
89
-
90
-
91
-
92
-
93
-
94
-
95
-
96
-
97
-
98
-
99
-
100
-
101
-
 102
102 -
 103
103 -
 104
104 -
 105
105 -
 106
106 -
 107
107 -
 108
108 -
 109
109 -
 110
110 -
 111
111 -
 112
112 -
113
-
114
-
115
-
116
-
117
-
118
-
119
-
120
-
121
-
122
-
123
-
124
-
125
-
126
-
127
-
128
-
129
-
130
-
131
-
132
-
133
-
134
-
135
-
136
-
137
-
138
-
139
-
140
-
141
-
142
-
143
-
144
-
145
-
146
-
147
-
148
-
149
-
150
-
151
-
152
-
153
-
154
-
155
-
156
-
157
-
158
-
159
-
160
-
161
 |
 |
