HP Photosmart c500 HP PhotoSmart C500 Digital Camera User’s Guide - C - Page 12
Adding Photos to a Group, Close, Delete, Group
 |
View all HP Photosmart c500 manuals
Add to My Manuals
Save this manual to your list of manuals |
Page 12 highlights
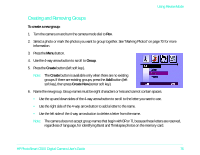
Using Review Mode 3. If the group is open, showing links between the photos, close the group by pressing the Close button (right soft key). 4. Select the photo that represents the group of photos. 5. Press the Menu button. The Edit menu displays with Delete highlighted. 6. Press the Delete button (center soft key). 7. Press the Delete button (left soft key) to delete all of the photos in the group. Remember that once photos are deleted, you cannot recover them. Adding Photos to a Group To add a photo to a group: 1. Turn the camera on and turn the camera mode dial to Rev. 2. Select a photo or mark the photos you want to add to the group. See "Marking Photos" on page 70 for more information. 3. Press the Menu button. 4. Use the 4-way arrow button to scroll to Group. 5. Press the Add button (left soft key). Note: The Add button is available only when there are existing groups. See "Creating and Removing Groups" on page 76 for details. HP PhotoSmart C500 Digital Camera User's Guide 78
-
 1
1 -
2
-
3
-
4
-
5
-
6
-
 7
7 -
 8
8 -
 9
9 -
 10
10 -
 11
11 -
 12
12 -
 13
13 -
 14
14 -
 15
15 -
 16
16 -
 17
17 -
18
-
19
-
20
-
21
-
22
-
23
-
24
-
25
-
26
 |
 |
