HP ProLiant DL185 HP Rack Rail Kit Installation Instructions (464164-001, Febr - Page 2
Mounting the server
 |
View all HP ProLiant DL185 manuals
Add to My Manuals
Save this manual to your list of manuals |
Page 2 highlights
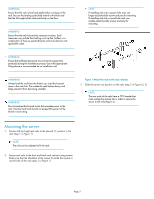
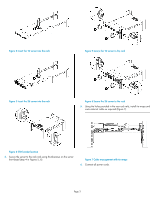
WARNING! Ensure that the rack is level and stable before working on the rack. Be sure the leveling jacks (feet) extend to the floor and that the full weight of the rack rests firmly on the floor. WARNING! Ensure that the rack has anti-tip measures in place. Such measures may include floor-bolting, anti-tip feet, ballast, or a combination of these as specified by the rack manufacturer and applicable codes. WARNING! Ensure that sufficient personnel are on hand to support the product(s) during the installation process. Use of the appropriate lifting device is recommended as an installation aid. WARNING! Always load the rack from the bottom up. Load the heaviest items in the rack first. This makes the rack bottom-heavy and helps prevent it from becoming unstable. WARNING! Do not overload the branch circuit that provides power to the rack. The total rack load should not exceed 80 percent of the branch circuit rating. NOTE: If installing rails into a square hole rack, use larger-sized shoulder screws and pins for mounting. If installing rails into a round hole rack, use smaller-sized shoulder screws and pins for mounting. Figure 1 Attach the rails to the rack columns 3. Slide the server into position on the rails (step 3 in Figures 2, 3). NOTE: The rear ends of the rails have a CTO bracket that must overlap the chassis tab in order to secure the server to the rails (Figure 4). Mounting the server 1. Position left and right rack rails at the desired 'U' position in the rack (step 1 in Figure 1). NOTE: The rails can be adjusted to fit the rack. 2. Secure rack rails to the front and back rack columns using screws. Make sure that the shoulders of the screws fit inside the square or round holes of the rack (step 2 in Figure 1). Page 2
-
 1
1 -
 2
2 -
 3
3
 |
 |
