HP ProLiant SL160s HP ProLiant SL160s G6 Server Installation Instructions - Page 7
Press the tabs on the processor installation tool to separate it
 |
View all HP ProLiant SL160s manuals
Add to My Manuals
Save this manual to your list of manuals |
Page 7 highlights
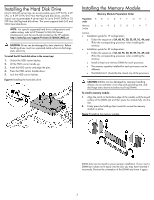
4. Press the tabs on the processor installation tool to separate it from the processor, and then remove the tool. Figure 11 Removing the processor installation tool Figure 13 Installing the PCI air baffle Figure 14 Detail information for installing the PCI air baffle 5. Close the processor socket retaining bracket and the processor locking lever. The processor socket cover is automatically ejected. Remove the cover. Figure 12 Closing the processor socket CAUTION: Failure to completely open the processor locking lever prevents the processor from seating during installation, leading to hardware damage. For processor removal, reverse the above installation procedures. To install the PCI air baffle: NOTE: The PCI air baffle is required for proper thermal solution. Need to install a PCI air baffle before installing the heat sink. 1. Align the PCI air baffle facing the hole on the system board and installed it as described in below figure. To install the heatsink: 1. Properly align the heat sink mounting pins to the system board mounting holes. 2. Tighten the mounting pins clockwise to secure the heat sink connection to the system board. CAUTION: To prevent the heat sink from tilting to one side during installation/removal, turn each screw a couple of turns, alternatively between both of them, and then apply the final torque. Do not over tighten the spring loaded screws to prevent them from breaking off. A maximum torque of 4.5 inch-lb is set for each screw. 7
-
 1
1 -
 2
2 -
 3
3 -
 4
4 -
 5
5 -
 6
6 -
 7
7 -
 8
8
 |
 |
