HP ProLiant SL165s HP ProLiant SL165s G7 Server Installation Instructions - Page 5
Installing the Memory Module
 |
View all HP ProLiant SL165s manuals
Add to My Manuals
Save this manual to your list of manuals |
Page 5 highlights
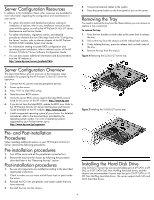
NOTE: For specific supported hard drive configurations and cable routing, refer to HP ProLiant SL165s G7 Server Maintenance and Service Guide located on the HP website: http://www.hp.com/support/ProLiant_SL165sG7_MSG_en CAUTION: Drives can be damaged by static electricity. Before handling drives, touch an unpainted metal surface to discharge static electricity. To install the LFF hard disk drive in the server tray: 1. Unlock the HDD carrier latches. 2. Lift the HDD carrier handle up. 3. Insert the HDD carrier and align the pins. 4. Press the HDD carrier handle down. 5. Lock the HDD carrier latches. Figure 6 Installing the hard disk drive NOTE: SR = Single Rank, DR = Dual Rank, QR = Quad Rank. Population rules must be followed for both processors. Memory modules may be populated one at a time per processor, but populating two at a time per processor provides better performance. Memory modules should be populated four at a time per processor for best performance. Quad Rank memory module can only be installed in memory sockets 2, 5, 8, and 11. CAUTION: DIMMs can be damaged by improper handling. Always use an anti-static wrist strap and grounding mat, and discharge static electricity before touching DIMMs. To install a memory module: 1. Align the notch on the bottom edge of the module with the keyed surface of the DIMM slot and then press the module fully into the slot. 2. Firmly press the holding clips inward to secure the memory module in place. Figure 7 Installing the memory module Installing the Memory Module Memory Module Population Order (From left to right) Memory Socket RDIMM population order without QR DIMM 1 7 4 10 3 9 6 12 2 8 5 11 UDIMM population order without QR DIMM Memory 1 7 4 10 3 9 6 12 X X X X Socket Memory Socket Population order with QR along with SR/DR DIMM 2 8 5 11 1 7 4 10 3 9 6 12 DIMM slots are structured to ensure proper installation. If you insert a DIMM but it does not fit easily into the slot, you may have inserted it incorrectly. Reverse the orientation of the DIMM and insert it again. 5
-
 1
1 -
 2
2 -
 3
3 -
 4
4 -
 5
5 -
 6
6 -
 7
7 -
 8
8
 |
 |
