HP ProLiant SL165s HP ProLiant SL165s G7 Server Installation Instructions - Page 6
Installing the Processor
 |
View all HP ProLiant SL165s manuals
Add to My Manuals
Save this manual to your list of manuals |
Page 6 highlights
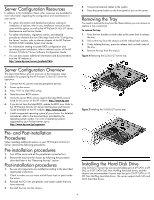
Installing the Processor To install the new processor: 1. Insert the processor in the tool. 2. Align the processor installation tool with the socket and install the processor. Figure 8 Installing the processor 1. Properly align the heat sink mounting pins to the system board mounting holes. 2. Tighten the mounting pins clockwise to secure the heat sink connection to the system board. CAUTION: To prevent the heat sink from tilting to one side during installation/removal, turn each screw a couple of turns, alternatively between both of them, and then apply the final torque. Do not over tighten the spring loaded screws to prevent them from breaking off. A maximum torque of 4.5 inch-lb is set for each screw. Figure 10 CPU 1 installing the heat sink with 17 fin pitches IMPORTANT: Be sure the processor remains inside the processor installation tool. 1. Press down firmly until the processor installation tool clicks and separates from the processor, and then remove the processor installation tool. 2. Close the processor socket retaining bracket and the processor retaining latch Figure 9 Removing the processor installation tool and close the processor socket Figure 11 CPU 2 installing the heat sink with 38 fin pitches For processor removal, reverse the above installation procedures. To install the heat sink: IMPORTANT: The one close to front panel is processor 1 and the other one is processor 2. During install the heat sink, make sure to install heat sink 1(on the processor 1) with 17 fin pitches, while heat sink 2(on the processor 2) with 38 fin pitches. CAUTION: Be sure that the heat sink sits squarely on the processor, or overheating and damage to the processor may occur. IMPORTANT: If the heat sink has been removed for any reason, it is critical that you apply more thermal interface material to the integrated heat spreader on the processor to ensure proper thermal bonding between the processor and the heat sink. Clean the contact surface of both the processor and heat sink with an alcohol pad, then re-apply an HP-approved thermal interface material before reinstalling the processor. Use a pattern of five dots when applying the thermal interface material-one dot in the center, and one dot at each corner. 6
-
 1
1 -
 2
2 -
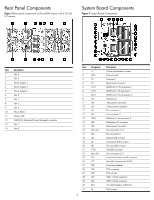 3
3 -
 4
4 -
 5
5 -
 6
6 -
 7
7 -
 8
8
 |
 |
