HP ProLiant SL165s HP ProLiant SL165s G7 Server Installation Instructions - Page 7
Installing the DIMM Air Baffle, Installing the CPU Air Baffle
 |
View all HP ProLiant SL165s manuals
Add to My Manuals
Save this manual to your list of manuals |
Page 7 highlights
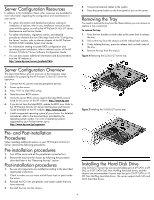
NOTE: Do not over tighten the heat sink's spring-loaded screws to prevent them from breaking off. Installing the DIMM Air Baffle NOTE: The DIMM air baffle is required for proper thermal solution. 1. Hold the latch on the top of the DIMM air baffle and align it to the system board. 2. Press down to make sure the DIMM air baffle completely installed NOTE: To check and ensure the 2 ribs are installed between DIMM1 and DIMM2, DIMM11 and DIMM12. Figure 12 Installing the DIMM air baffle into the tray Figure 13 Installing the CPU air baffle into the tray Additional Documentation For additional documentation, refer to HP ProLiant SL165s G7 Server Easy Set-up CD. You can also access additional information and documentation from the HP external website, either by connecting directly or through the Easy Set-up CD. Installing the CPU Air Baffle NOTE: The CPU air baffle is required for proper thermal solution. To install the CPU air baffle: 1. Align the CPU air baffle to the tray. 2. Secure the left latch to the left bracket, the middle latch to the middle bracket and the right latch to the PCIe x16 bracket on the tray. 3. Press down the CPU air baffle to make sure it completely installed on the tray. 7
-
 1
1 -
 2
2 -
 3
3 -
 4
4 -
 5
5 -
 6
6 -
 7
7 -
 8
8
 |
 |
