HP RP7 Hardware Reference Guide HP RP7 Retail System Model 7800 - Page 61
screws through the mounting bracket and into the display head to secure it in place 2.
 |
View all HP RP7 manuals
Add to My Manuals
Save this manual to your list of manuals |
Page 61 highlights
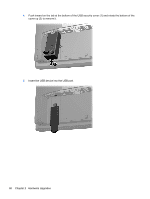
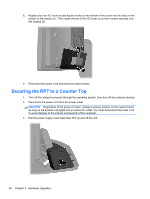
14. Swing the antenna bracket in toward the chassis (1), connect the DisplayPort signal cable (2) and power cable (3), and close the memory access door (4). 15. Attach the RP7 display head to the stand's mounting bracket by aligning the slots on the display head with the hooks on the mounting bracket and sliding the display down (1). Install the three screws through the mounting bracket and into the display head to secure it in place (2). Replacing the Battery 55
-
 1
1 -
2
-
3
-
4
-
5
-
6
-
7
-
8
-
9
-
10
-
11
-
12
-
13
-
14
-
15
-
16
-
17
-
18
-
19
-
20
-
21
-
22
-
23
-
24
-
25
-
26
-
27
-
28
-
29
-
30
-
31
-
32
-
33
-
34
-
35
-
36
-
37
-
38
-
39
-
40
-
41
-
42
-
43
-
44
-
45
-
46
-
47
-
48
-
49
-
50
-
51
-
52
-
53
-
54
-
55
-
 56
56 -
 57
57 -
 58
58 -
 59
59 -
 60
60 -
 61
61 -
 62
62 -
 63
63 -
 64
64 -
 65
65 -
 66
66 -
67
-
68
-
69
-
70
-
71
-
72
-
73
-
74
-
75
-
76
-
77
 |
 |

14.
Swing the antenna bracket in toward the chassis (1), connect the DisplayPort signal cable (2)
and power cable (3), and close the memory access door (4).
15.
Attach the RP7 display head to the stand's mounting bracket by aligning the slots on the display
head with the hooks on the mounting bracket and sliding the display down (1). Install the three
screws through the mounting bracket and into the display head to secure it in place (2).
Replacing the Battery
55