HP Rp5000 Hardware Reference Guide (2nd Edition) - Page 21
connector seats properly in the expansion card slot., the corner bracket
 |
UPC - 808736747592
View all HP Rp5000 manuals
Add to My Manuals
Save this manual to your list of manuals |
Page 21 highlights
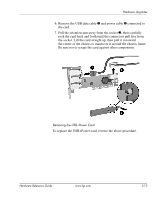
7. Install the expansion card. Hardware Upgrades Installing an Expansion Card 8. Rotate the slot cover retention latch back in place to secure the expansion card. ✎ When you install an expansion card, make sure to line it up with the corner bracket, then press firmly on the card so that the whole connector seats properly in the expansion card slot. 9. Replace the expansion card cage. Ä CAUTION: If you remove an expansion card, you must replace it with a new card or cover the open slot (for example, with a metal slot cover) for proper air circulation to cool internal components during operation. Hardware Reference Guide www.hp.com 2-11
-
 1
1 -
2
-
3
-
4
-
5
-
6
-
7
-
8
-
9
-
10
-
11
-
12
-
13
-
14
-
15
-
 16
16 -
 17
17 -
 18
18 -
 19
19 -
 20
20 -
 21
21 -
 22
22 -
 23
23 -
 24
24 -
 25
25 -
 26
26 -
27
-
28
-
29
-
30
-
31
-
32
-
33
-
34
-
35
-
36
-
37
-
38
-
39
-
40
-
41
-
42
-
43
-
44
-
45
-
46
-
47
-
48
-
49
-
50
-
51
-
52
-
53
-
54
-
55
-
56
-
57
-
58
-
59
-
60
-
61
-
62
-
63
 |
 |

Hardware Reference Guide
www.hp.com
2-11
Hardware Upgrades
7. Install the expansion card.
Installing an Expansion Card
8. Rotate the slot cover retention latch back in place to secure the
expansion card.
✎
When you install an expansion card, make sure to line it up with
the corner bracket, then press firmly on the card so that the whole
connector seats properly in the expansion card slot.
9. Replace the expansion card cage.
Ä
CAUTION:
If you remove an expansion card, you must replace it with a
new card or cover the open slot (for example, with a metal slot cover) for
proper air circulation to cool internal components during operation.