HP SW TL881 DLT Mini-Lib/1 Compaq TL881 MiniLibrary Drive Upgrade Procedure (M - Page 12
Removing and Replacing the Skin Cover Desktop, Models Only, Removing, Replacing
 |
View all HP SW TL881 DLT Mini-Lib/1 manuals
Add to My Manuals
Save this manual to your list of manuals |
Page 12 highlights
Adding a Second Tape Drive 3 4. Install the new drive using the procedure described in this document. 5. Replace the drive caddy assembly. 6. Replace the cover plate. 7. Replace the skin cover. Removing and Replacing the Skin Cover (Desktop Models Only) The skin cover is held in place by two screws on each side of the base module (Figure 2). Figure 2. Removing the Skin Cover SHR-1433 Removing Do these steps to remove the skin cover from the base module. 1. Remove the two screws on each side of the base module. 2. Grasp the cover by the sides at the bottom edge and pull outwards slightly while lifting the cover straight up and off the chassis. Replacing Do these steps to replace the skin cover on the base module.
-
 1
1 -
2
-
3
-
4
-
5
-
6
-
 7
7 -
 8
8 -
 9
9 -
 10
10 -
 11
11 -
 12
12 -
 13
13 -
 14
14 -
 15
15 -
 16
16 -
 17
17 -
18
-
19
 |
 |

Adding a Second Tape Drive
3
4.
Install the new drive using the procedure described in this document.
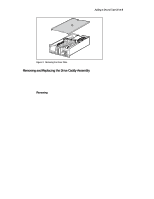
5.
Replace the drive caddy assembly.
6.
Replace the cover plate.
7.
Replace the skin cover.
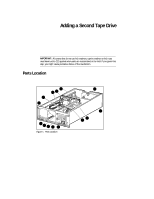
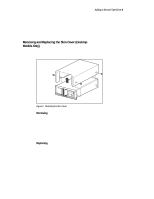
Removing and Replacing the Skin Cover (Desktop
Models Only)
The skin cover is held in place by two screws on each side of the base
module (Figure 2).
SHR-1433
Figure 2.
Removing the Skin Cover
Removing
Do these steps to remove the skin cover from the base module.
1.
Remove the two screws on each side of the base module.
2.
Grasp the cover by the sides at the bottom edge and pull outwards
slightly while lifting the cover straight up and off the chassis.
Replacing
Do these steps to replace the skin cover on the base module.