HP SW TL881 DLT Mini-Lib/1 Compaq TL881 MiniLibrary Drive Upgrade Procedure (M - Page 13
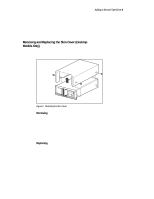
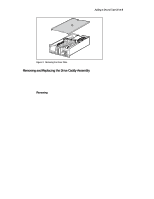
Removing and Replacing the Cover Plate
 |
View all HP SW TL881 DLT Mini-Lib/1 manuals
Add to My Manuals
Save this manual to your list of manuals |
Page 13 highlights
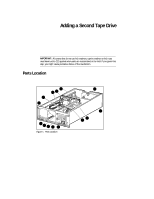
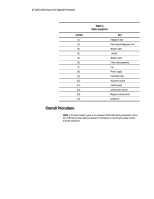
4 TL881 MiniLibrary Drive Upgrade Procedure 1. Position the skin cover over the base module with the two angled surfaces facing toward the front. 2. Slide the skin cover over the module until it touches the front panel. 3. Insert the two screws on each side through the skin cover into the base module; insert and start all four screws before you tighten any of them. Removing and Replacing the Cover Plate Removing Do these steps to remove the cover plate from the base module. 1. If the base module is a desktop model, remove the skin cover as described in Removing and Replacing the Skin Cover (Desktop Models Only). 2. Disconnect the power and interface cables at the rear of the module. 3. Unscrew the captive screw in the center of the cover plate (Figure 3). 4. Slide the cover plate one-half inch toward the rear of the module. 5. Lift the cover plate off the base module. Replacing Do these steps to replace the cover plate on the base module. 1. Place the cover plate on the base module so that it overhangs one-half inch at the rear of the module (Figure 3). 2. Slide the cover plate toward the front of the base module until the cover plate touches the front panel. 3. Tighten the captive screw in the center of the cover plate. 4. Connect the power and interface cables at the rear of the module. 5. If the base module is a desktop model, replace the skin cover as described in Removing and Replacing the Skin Cover (Desktop Models Only).
-
 1
1 -
2
-
3
-
4
-
5
-
6
-
7
-
 8
8 -
 9
9 -
 10
10 -
 11
11 -
 12
12 -
 13
13 -
 14
14 -
 15
15 -
 16
16 -
 17
17 -
 18
18 -
19
 |
 |
