HP Scanjet Enterprise 7000n HP Scanjet Enterprise 7000n - (multiple language) - Page 17
Solve problems
 |
View all HP Scanjet Enterprise 7000n manuals
Add to My Manuals
Save this manual to your list of manuals |
Page 17 highlights
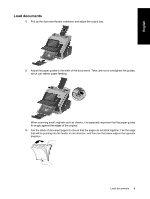
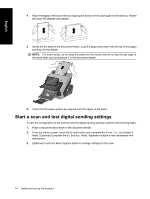
English 4. Touch the Start button . 5. If you want to test other digital sending methods that you have configured using the EWS, such as save to USB, digital fax, network folder, or Quick Sets, complete the following steps from the Home screen and verify that the scan is sent to the correct destination. ◦ To save a scan to USB, touch the Save to USB button, select a folder if required, and then touch the Start button . ◦ To save a scan to a network folder, touch the Save to Network Folder button. In the Quick Sets list box, touch a folder name, type the file name in the File Name: field, and then touch the Start button . ◦ To scan to a digital fax, touch the Fax button, touch the Fax Number: field, type the fax number, and then touch the Start button . Separate multiple fax numbers with semicolons. If the product does not send the file correctly, verify the product installation and configuration. For more information about the screens and controls for each screen, see the electronic User Guide. Solve problems For information on how to solve scanning and network problems, see the troubleshooting information in the electronic User Guide. Replace parts The HP Scanjet 7000n has several replaceable parts, including the keyboard and control panel overlays, Jetdirect card, and feed rollers. To order replaceable parts, go to www.hp.com/buy/parts. Installation troubleshooting If the scanner does not work properly after initial set up, check the scanner hardware as described here. Check that the scanner has power Ensure that the power cable is securely connected between the scanner and the power supply, and that the power supply cable is securely connected between the power supply and a power outlet or surge protector. 1. Check that the green LED on the power supply case is on. 2. If the green LED is not on, ensure that power is available to the power outlet or surge protector that the power supply cable is plugged into. 3. Check that the power switch on the back of the scanner is in the on position, then press the power button on the front of the scanner to turn on the scanner. 4. If power is available to the power outlet or surge protector but the green LED is still not on, the power supply might be defective. See www.hp.com/support for assistance. Solve problems 11
-
 1
1 -
2
-
3
-
4
-
5
-
6
-
7
-
8
-
9
-
10
-
11
-
 12
12 -
 13
13 -
 14
14 -
 15
15 -
 16
16 -
 17
17 -
 18
18 -
 19
19 -
 20
20 -
 21
21 -
 22
22 -
23
-
24
-
25
-
26
-
27
-
28
-
29
-
30
-
31
-
32
-
33
-
34
-
35
-
36
-
37
-
38
-
39
-
40
-
41
-
42
-
43
-
44
-
45
-
46
-
47
-
48
-
49
-
50
-
51
-
52
-
53
-
54
-
55
-
56
-
57
-
58
-
59
-
60
-
61
-
62
-
63
-
64
-
65
-
66
-
67
-
68
 |
 |
