HP Scitex LX600 HP Scitex LX Printer Family - User's guide - Page 46
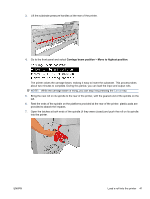
Start main, roller motion
 |
View all HP Scitex LX600 manuals
Add to My Manuals
Save this manual to your list of manuals |
Page 46 highlights
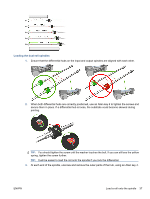
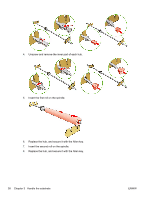
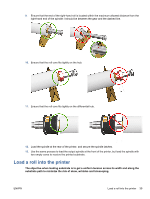
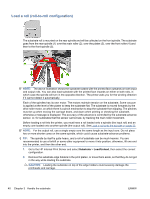
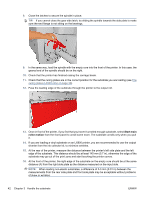
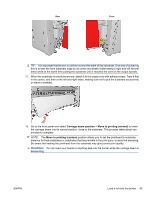
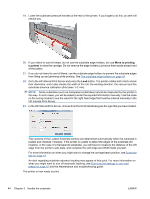
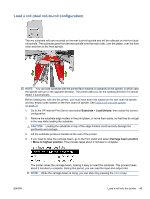
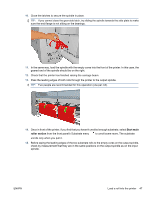
8. Close the latches to secure the spindle in place. TIP: If you cannot close the gear side latch, try sliding the spindle towards the side plate to make sure the end flange is not sitting on the bearings. 9. In the same way, load the spindle with the empty core into the front of the printer. In this case, the geared end of the spindle should be on the right. 10. Check that the printer has finished raising the carriage beam. 11. Check that the curing plates are in the correct position for the substrate you are loading (see The curing plates (LX800 only) on page 30). 12. Pass the leading edge of the substrate through the printer to the output roll. 13. Once in front of the printer, if you find that you haven't unrolled enough substrate, select Start main roller motion from the front panel to unroll some more. The substrate unrolls only when you pull it. 14. If you are loading a vinyl substrate on an LX800 printer, you are recommended to use the output diverter from the ink collector kit, to minimize wrinkles. 15. At the rear of the printer, measure the distance between the printer's left side plate and the left edge of the substrate. This distance should be at least 145 mm (5.7 in), otherwise the edge of the substrate may go out of the print zone and start touching the printer covers. 16. At the front of the printer, the right edge of the substrate on the empty core should be at the same distance (A) from the right side plate as the distance measured on the input side. NOTE: When loading non-elastic substrates, a difference of 2-3 mm (0.01 in) between the measurements from the rear side plate and front side plate may be acceptable without problems of skew or wrinkles. 42 Chapter 3 Handle the substrate ENWW
-
 1
1 -
2
-
3
-
4
-
5
-
6
-
7
-
8
-
9
-
10
-
11
-
12
-
13
-
14
-
15
-
16
-
17
-
18
-
19
-
20
-
21
-
22
-
23
-
24
-
25
-
26
-
27
-
28
-
29
-
30
-
31
-
32
-
33
-
34
-
35
-
36
-
37
-
38
-
39
-
40
-
 41
41 -
 42
42 -
 43
43 -
 44
44 -
 45
45 -
 46
46 -
 47
47 -
 48
48 -
 49
49 -
 50
50 -
 51
51 -
52
-
53
-
54
-
55
-
56
-
57
-
58
-
59
-
60
-
61
-
62
-
63
-
64
-
65
-
66
-
67
-
68
-
69
-
70
-
71
-
72
-
73
-
74
-
75
-
76
-
77
-
78
-
79
-
80
-
81
-
82
-
83
-
84
-
85
-
86
-
87
-
88
-
89
-
90
-
91
-
92
-
93
-
94
-
95
-
96
-
97
-
98
-
99
-
100
-
101
 |
 |
