HP Scitex LX820 HP Scitex LX850 & LX820 Printer: Installation Guide - Page 44
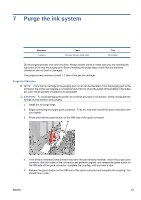
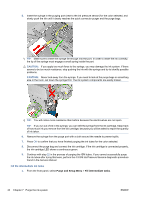
Ink Supply Legend, CAUTION, Check that the ink has arrived as far as the purging bag and purger.
 |
View all HP Scitex LX820 manuals
Add to My Manuals
Save this manual to your list of manuals |
Page 44 highlights
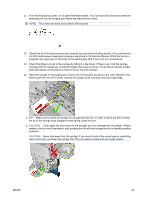
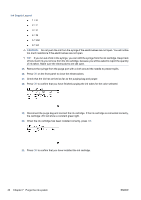
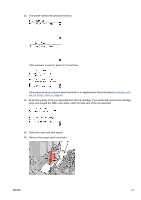
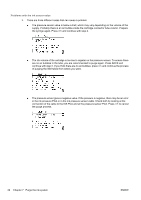
Ink Supply Legend ● 1=K ● 2=Y ● 3=C ● 4=M ● 5 = LM ● 6 = LC CAUTION: Do not push the ink from the syringe if the electrovalves are not open. You will notice too much resistance if the electrovalves are not open. TIP: If you run out of ink in the syringe, you can refill the syringe from the ink cartridge. Keep track of how much ink you remove from the ink cartridge, because you will be asked to report the quantity of ink taken. Make sure the electrovalves are still open. 15. Remove the syringe from the purge port with a cloth around the needle to prevent spills. 16. Press OK on the front panel to close the electrovalves. 17. Check that the ink has arrived as far as the purging bag and purger. 18. Press OK to confirm that you have finished purging the ink tubes for the color selected. 19. Disconnect the purge bag and connect the ink cartridge. If the ink cartridge is connected correctly, the cartridge LED will show a constant green light. 20. When the ink cartridge has been installed correctly, press OK. 21. Press OK to confirm that you have installed the ink cartridge. 40 Chapter 7 Purge the ink system ENWW
-
 1
1 -
2
-
3
-
4
-
5
-
6
-
7
-
8
-
9
-
10
-
11
-
12
-
13
-
14
-
15
-
16
-
17
-
18
-
19
-
20
-
21
-
22
-
23
-
24
-
25
-
26
-
27
-
28
-
29
-
30
-
31
-
32
-
33
-
34
-
35
-
36
-
37
-
38
-
 39
39 -
 40
40 -
 41
41 -
 42
42 -
 43
43 -
 44
44 -
 45
45 -
 46
46 -
 47
47 -
 48
48 -
 49
49 -
50
-
51
-
52
-
53
-
54
-
55
-
56
-
57
-
58
-
59
-
60
-
61
-
62
-
63
-
64
-
65
-
66
-
67
-
68
-
69
-
70
-
71
-
72
-
73
-
74
-
75
-
76
-
77
-
78
-
79
-
80
-
81
-
82
-
83
-
84
-
85
 |
 |
