HP Scitex LX820 HP Scitex LX850 & LX820 Printer: Installation Guide - Page 64
printhead cleaning roll while the printhead is being cleaned.
 |
View all HP Scitex LX820 manuals
Add to My Manuals
Save this manual to your list of manuals |
Page 64 highlights
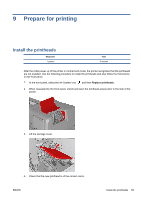
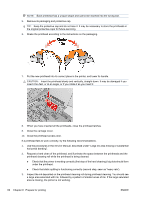
NOTE: Each printhead has a unique shape and cannot be inserted into the wrong slot. 5. Remove its packaging and protective cap. TIP: Keep the protective cap and do not lose it. It may be necessary to store the printheads in the original protective caps for future servicing. 6. Shake the printhead according to the instructions on the packaging. 7. Put the new printhead into its correct place in the printer, and lower its handle. CAUTION: Insert the printhead slowly and vertically, straight down. It may be damaged if you insert it too fast, or at an angle, or if you rotate it as you insert it. 8. When you have inserted all the printheads, close the printhead latches. 9. Close the carriage cover. 10. Close the printhead access door. If a printhead fails to work correctly, try the following recommendations. 1. Use the procedures in the Service Manual, described under "Large ink area missing or substantial horizontal banding". 2. Request a hard clean of the printhead, and illuminate the space between the printheads and the printhead cleaning roll while the printhead is being cleaned. ● Check that the primer is working correctly (first step of the hard cleaning): big dots should form under the printhead. ● Check that static spitting is functioning correctly (second step, seen as 'heavy rain'). 3. Inspect the ink deposited on the printhead cleaning roll during printhead cleaning. You should see a large area saturated with ink, followed by a pattern of smaller areas of ink. If the large saturated area is missing, the primer is not working. 60 Chapter 9 Prepare for printing ENWW
-
 1
1 -
2
-
3
-
4
-
5
-
6
-
7
-
8
-
9
-
10
-
11
-
12
-
13
-
14
-
15
-
16
-
17
-
18
-
19
-
20
-
21
-
22
-
23
-
24
-
25
-
26
-
27
-
28
-
29
-
30
-
31
-
32
-
33
-
34
-
35
-
36
-
37
-
38
-
39
-
40
-
41
-
42
-
43
-
44
-
45
-
46
-
47
-
48
-
49
-
50
-
51
-
52
-
53
-
54
-
55
-
56
-
57
-
58
-
 59
59 -
 60
60 -
 61
61 -
 62
62 -
 63
63 -
 64
64 -
 65
65 -
 66
66 -
 67
67 -
 68
68 -
 69
69 -
70
-
71
-
72
-
73
-
74
-
75
-
76
-
77
-
78
-
79
-
80
-
81
-
82
-
83
-
84
-
85
 |
 |
