HP StorageWorks 4/256 Brocade Web Tools Administrator's Guide v6.3.0 (53-10013 - Page 318
Create Port CUP Connectivity Configuration
 |
View all HP StorageWorks 4/256 manuals
Add to My Manuals
Save this manual to your list of manuals |
Page 318 highlights
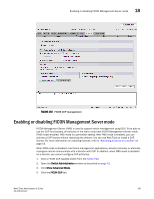
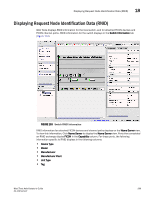
18 CUP port connectivity configuration • To create a new configuration, click New. The Create Port CUP Connectivity Configuration dialog box displays all ports and port names on the selected switch (similar to the dialog box shown in Figure 152). The Block column, Prohibit column, and prohibited ports matrix are displayed as empty, for you to configure. • To edit an existing configuration, click the configuration, and then click Edit. The Edit Port CUP Connectivity Configuration dialog box displays the content of the selected configuration from the switch in a table format (Figure 152). 3. Optional: Select the check box corresponding to a port you want to block on the Block column. Repeat this step for all ports you want to block. Select the Block All check box to block all ports. 4. Optional: Select the check box corresponding to a port you want to prohibit on the Prohibit column. Repeat this step for all ports you want to prohibit. Select the Prohibit All check box to prohibit all ports. The cells in the matrix are updated with "X" icons to identify prohibited ports. FE and FF ports will be in the disabled state in FMS mode. 5. Optional: Click the individual cells corresponding to the combination of ports you want to prohibit. You cannot prohibit a port to itself. If you prohibit E_Port, E-E connection, or E-F connection, a warning message is displayed, "You have placed a prohibit on an E-Port. This has no effect for Fabric OS based fabrics". 6. Review your changes. A blue background in a cell indicates that its value has been modified. 7. After you have finished making changes, do any of the following: • Click Activate to save the changes and make the configuration active immediately, as described in "Activating a CUP Port Connectivity Configuration" on page 287. • Click Save to save the changes but not make the configuration active. • Click Save As to save the configuration to a new configuration file. When you click Save As, a dialog box displays in which you should type a file name and description for the configuration file. • Click Refresh to refresh the information from the switch. • Click Cancel to cancel all changes without saving. 286 Web Tools Administrator's Guide 53-1001343-01
-
 1
1 -
2
-
3
-
4
-
5
-
6
-
7
-
8
-
9
-
10
-
11
-
12
-
13
-
14
-
15
-
16
-
17
-
18
-
19
-
20
-
21
-
22
-
23
-
24
-
25
-
26
-
27
-
28
-
29
-
30
-
31
-
32
-
33
-
34
-
35
-
36
-
37
-
38
-
39
-
40
-
41
-
42
-
43
-
44
-
45
-
46
-
47
-
48
-
49
-
50
-
51
-
52
-
53
-
54
-
55
-
56
-
57
-
58
-
59
-
60
-
61
-
62
-
63
-
64
-
65
-
66
-
67
-
68
-
69
-
70
-
71
-
72
-
73
-
74
-
75
-
76
-
77
-
78
-
79
-
80
-
81
-
82
-
83
-
84
-
85
-
86
-
87
-
88
-
89
-
90
-
91
-
92
-
93
-
94
-
95
-
96
-
97
-
98
-
99
-
100
-
101
-
102
-
103
-
104
-
105
-
106
-
107
-
108
-
109
-
110
-
111
-
112
-
113
-
114
-
115
-
116
-
117
-
118
-
119
-
120
-
121
-
122
-
123
-
124
-
125
-
126
-
127
-
128
-
129
-
130
-
131
-
132
-
133
-
134
-
135
-
136
-
137
-
138
-
139
-
140
-
141
-
142
-
143
-
144
-
145
-
146
-
147
-
148
-
149
-
150
-
151
-
152
-
153
-
154
-
155
-
156
-
157
-
158
-
159
-
160
-
161
-
162
-
163
-
164
-
165
-
166
-
167
-
168
-
169
-
170
-
171
-
172
-
173
-
174
-
175
-
176
-
177
-
178
-
179
-
180
-
181
-
182
-
183
-
184
-
185
-
186
-
187
-
188
-
189
-
190
-
191
-
192
-
193
-
194
-
195
-
196
-
197
-
198
-
199
-
200
-
201
-
202
-
203
-
204
-
205
-
206
-
207
-
208
-
209
-
210
-
211
-
212
-
213
-
214
-
215
-
216
-
217
-
218
-
219
-
220
-
221
-
222
-
223
-
224
-
225
-
226
-
227
-
228
-
229
-
230
-
231
-
232
-
233
-
234
-
235
-
236
-
237
-
238
-
239
-
240
-
241
-
242
-
243
-
244
-
245
-
246
-
247
-
248
-
249
-
250
-
251
-
252
-
253
-
254
-
255
-
256
-
257
-
258
-
259
-
260
-
261
-
262
-
263
-
264
-
265
-
266
-
267
-
268
-
269
-
270
-
271
-
272
-
273
-
274
-
275
-
276
-
277
-
278
-
279
-
280
-
281
-
282
-
283
-
284
-
285
-
286
-
287
-
288
-
289
-
290
-
291
-
292
-
293
-
294
-
295
-
296
-
297
-
298
-
299
-
300
-
301
-
302
-
303
-
304
-
305
-
306
-
307
-
308
-
309
-
310
-
311
-
312
-
 313
313 -
 314
314 -
 315
315 -
 316
316 -
 317
317 -
 318
318 -
 319
319 -
 320
320 -
 321
321 -
 322
322 -
 323
323 -
324
-
325
-
326
-
327
-
328
-
329
-
330
-
331
-
332
-
333
-
334
-
335
-
336
-
337
-
338
-
339
-
340
-
341
-
342
-
343
-
344
-
345
-
346
-
347
-
348
-
349
-
350
-
351
-
352
-
353
-
354
-
355
-
356
-
357
-
358
-
359
-
360
-
361
-
362
-
363
-
364
-
365
-
366
-
367
-
368
-
369
-
370
 |
 |