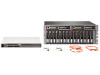
HP StorageWorks MSA1000 HP StorageWorks Modular Smart Array 1000 Small Busines - Page 2
Rack the devices, Install the hard drives, Install the HBAs - support software cd
 |
View all HP StorageWorks MSA1000 manuals
Add to My Manuals
Save this manual to your list of manuals |
Page 2 highlights
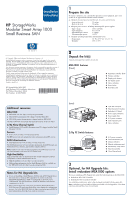
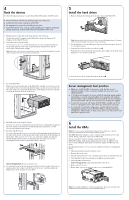
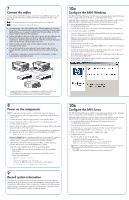
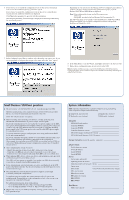
4 Rack the devices Use the following instructions to rack both the MSA1000 and the 2/8q FC Switch. ● Mount all devices with the port-side facing the rear of the rack. ● Install hard drives after racking the MSA1000. ● Use appropriate caution when handling heavy items. ● Locate the heaviest items, such as uninterruptable power supplies, additional storage enclosures, and the MSA1000 near the bottom of the rack. l. Mark the holes for the rails on the front and the back of the rack. Use the Universal 4U template for the MSA1000, and use the Universal 2U template for the 2/8q FC Switch. 2. Install the rails for the MSA1000. From the front of the rack, install the Universal 4U rails, verifying that the pins on the front and back of the rails extend through the marked holes, and the scissor-type locking latches engage. Note: If the holes in the rack are round instead of square, remove the standard pins from the rails and replace them with the provided round-hole pins. 5 Install the hard drives 1. Remove the hard drive blanks from the drive bays in the MSA1000. 1 2 Note: Remove blanks only from bays in which you are installing hard drives. For proper airflow and cooling, blanks must remain in any unused bays. 2. On the hard drive to be installed, press the ejector button and pivot the lever to a full open position. 3. Insert the hard drive into the vacant drive bay 1. With the ejector lever in the full open position, press firmly on the front of the hard drive to seat the drive in the bay. 1 2 3. Rack the MSA1000. Remove the bezel from the front of the MSA1000, and then, from the front of the rack, slide the device onto the rails until the flanges on the device are flush with the front of the rack. Secure the thumbscrews on the flanges to the rack, and then re-attach the bezel to the front of the device. 4. Close the ejector lever against the front of the drive 2. Server management best practices ● Before you install the HBA in the server, verify that the server is operating properly. Follow instructions shipped with your server and operating system. ● In Windows environments, be sure to install all operating system updates and patches. A recently released update which supports multi-pathing failover (MPIO) must be installed, before proceeding with this installation. Go to the Mircrosoft web site (www.microsoft.com) to obtain this update. ● If more than one server will access the MSA1000, consider one of the servers a management server, from which you will perform most tasks. ● In a clustered or multi-path configuration, install Small Business SAN management software, such as the MPIO failover software and Array Configuration Utility (ACU), on each server, even if you will perform most tasks from a specific server. 4. Install the rails for the 2/8q FC Switch. From the rear of the rack, install the Universal 2U rails, verifying that the pins on the front and the back of the rails extend through the marked holes, and the scissor-type locking latches engage. 5. Rack the 2/8q FC Switch. Use four of the provided screws to attach the switch mounting adapter brackets to the sides of the switch, so that the port-side of the switch faces the front flanges of the brackets. Then, from the rear of the rack, slide the assembly onto the rails until the flanges on the brackets are flush with the rear of the rack. Use the remaining provided screws to secure the flanges to the rack. Note for HA Upgrade kits: Rack the redundant switch. 6. For each device, move the rail retaining brackets from the far edge of the rails to a position where they connect with the back of the device, and then tighten the thumbscrews on the brackets to secure them. 6 Install the HBAs Note: If the server is not yet installed and configured, do so at this time. Follow the instructions included with the server and the operating system. The HBA (Host Bus Adapter) is used to connect cables from the server to the switch, whose cables then connect to the MSA1000. One or more HBAs must be installed in each server that will access the MSA1000. Simple, single-path configurations need only one HBA in each server, while redundant, multi-path environments require two HBAs in each server. Installation procedures vary by server, but sample procedures are summarized below: 1. Shut down and remove power from the server. 2. Remove the server cover. 3. Identify the PCI bus slot to use, and then remove the cover blank for that slot. 4. Place the HBA in the slot, pressing on the HBA board until seated. 5. Secure the HBA to the chassis. Note for HA Upgrade kits: Install a redundant HBA in each server. 6. Replace the server cover. 7. Repeat these steps for each server with access to the MSA1000. Note: Do not install an HBA driver on the server at this time. Drivers are included on the Small Business SAN Software CD, and are installed in Step 10.
-
 1
1 -
 2
2 -
 3
3 -
 4
4
 |
 |
